Chapter 11 — Editor (marking and editing Gaussians)
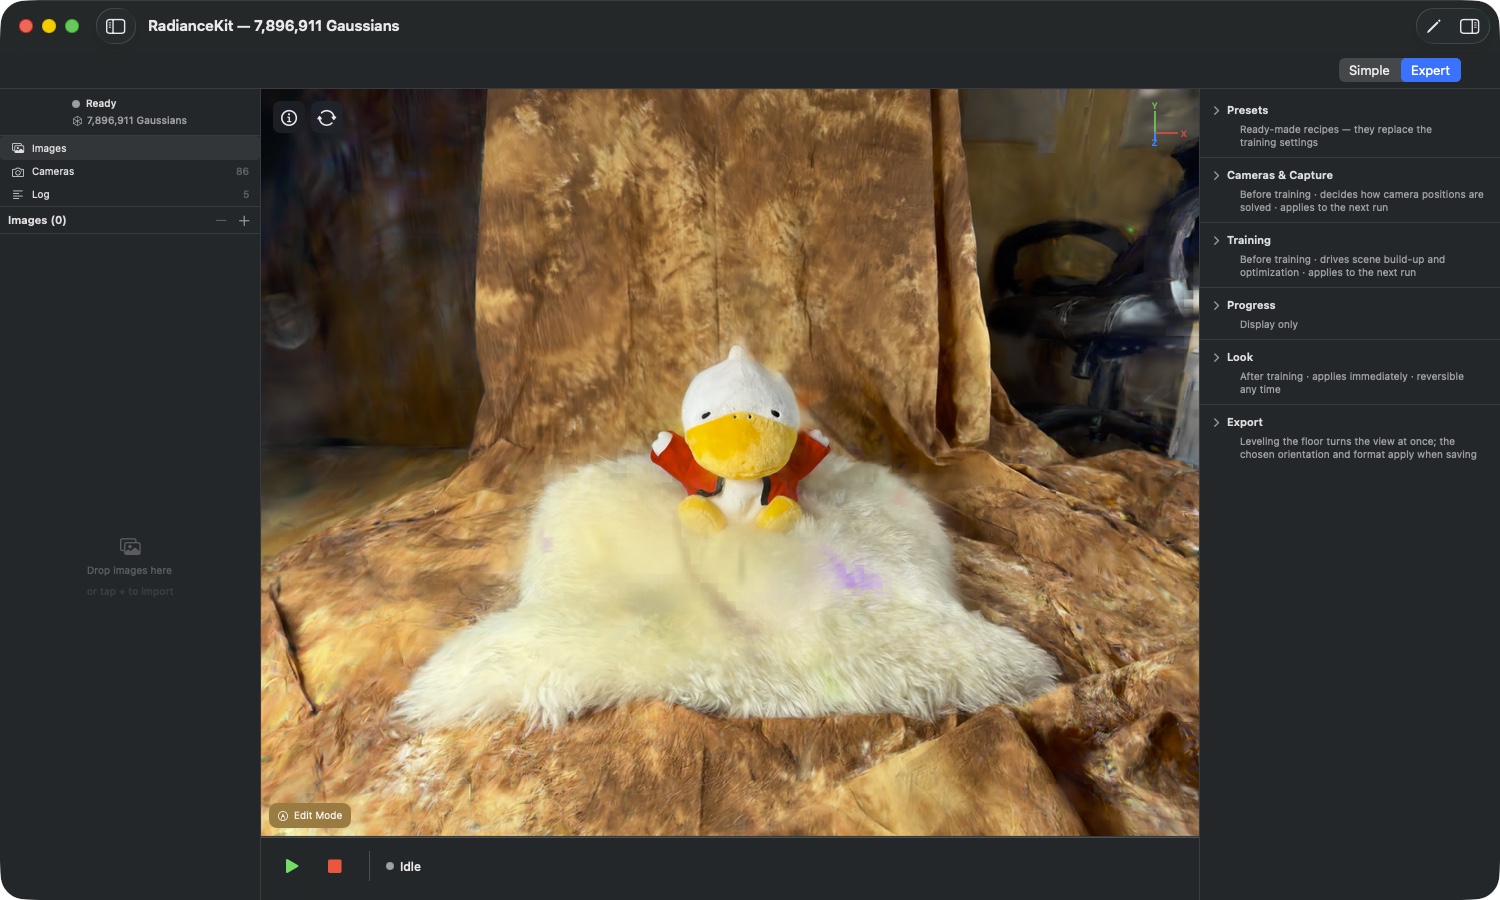
What the editor is: After training, a finished point cloud sits in the viewport — and in almost every scene there are leftovers in it that don't belong there: background you don't need, floating scraps hovering over the object, glaring patches of color in spots that no camera ever really saw. The editor is the way to reach these spots by hand. You paint over the image with a brush, the affected Gaussians are tinted red, and then you decide what happens to them: delete, keep only them, desaturate, or match their color to the surroundings.
The reason for this tool is inconvenient but honest: such splats can't be filtered out automatically. In their properties, they're no different from the good ones — they simply sit at a spot for which there was no training data. There's no filter that could reliably find them without also taking good splats along. So you have to catch them yourself.
The one rule that applies everywhere: Marked means "will be changed", unmarked means "stays" — or, when healing, "is the color source". Everything in the editor follows this division.

What you see in the image: As soon as the editor is on, a four-row toolbar replaces the single "Edit Mode" button. The top row is grouped by task: first the brush and its two checkboxes, then the counter with the three buttons that remove something (trash, scissors, droplet), then color repair with "Set Reference", "Heal" and the heal options, and on the far right undo, redo, and the close cross. As long as nothing is marked, all buttons that require a selection are grayed out. Below that are the three tools that constrain access: the slab (a band running across the scene), the cylinder (for drone scenes), and the floor row. The last row lists the extra keys that don't appear anywhere else on the screen.
Opening and Exiting (ED1–ED4)
The editor isn't a separate window but a state of the viewport. There are four equally valid ways in and out — and one case where it doesn't work at all.
ED1„Edit Mode" button
WHERE
Viewport → overlay bottom left → „Edit Mode" (pencil icon).
TECHNICAL
Switches the viewport into edit mode and replaces itself with the full toolbar. When switching on, the app applies the remembered heal options and re-measures the slab and cylinder against the point cloud that's currently loaded — position and radius always refer to the current scene, not the previous one. The tooltip on the button also mentions the Tab key as the fastest way in.
ED2Menu, toolbar, and the Tab key
WHERE
Viewport menu → „Enter Edit Mode" / „Exit Edit Mode" (⇧⌘E); window toolbar → „Edit"; Tab key in the viewport.
TECHNICAL
Three equally valid toggles for the same state. The menu item changes its label depending on whether the editor is currently running, and is grayed out as long as there's no editable scene. Both the menu route and the Tab key clean up the same things on exit as the close button: selection, striped splats, and the reference region are empty afterwards.
ED3Close button in the toolbar
WHERE
Editor toolbar → top right, round cross icon.
TECHNICAL
Exits edit mode and clears the entire transient state along the way: the selection, the striped splats, and the reference region for healing. What you've already applied — deleted, cropped, desaturated, or healed splats — is of course preserved; only the markers disappear. The edit history also remains intact, so you can keep undoing further back after re-entering.
ED4When the editor isn't available
WHERE
Viewport, when no „Edit Mode" button appears; Viewport menu, when the item is grayed out.
TECHNICAL
The editor needs a scene that the app draws with its own rasterizer — that is, the result of a completed training run or a scene loaded from disk that gets the same rendering treatment. As long as nothing is loaded at all, or the scene is displayed in the window via a different rendering path, there's no editable access to the individual Gaussians, and the button doesn't appear.
Brush and Selection (ED5–ED11)
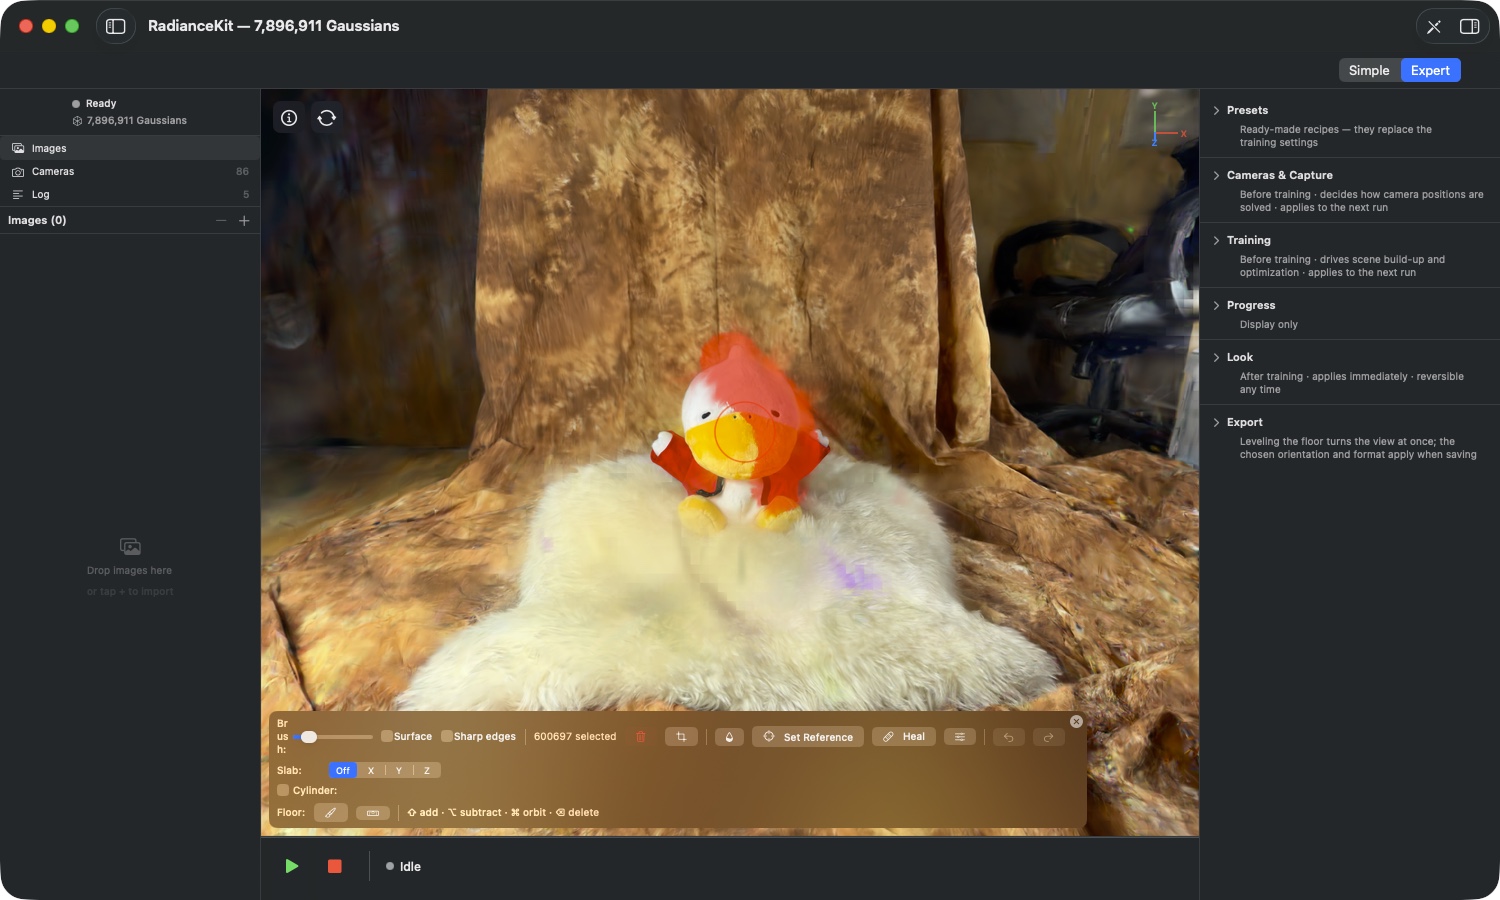
What you see in the image: A single stroke has marked a good 600,000 Gaussians here. The hit splats are colored red — this is purely a display effect and doesn't change the stored colors in any way. The counter in the toolbar tracks the number live, and the moment the selection is no longer empty, the trash, scissors, and dropper become clickable.
ED5„Brush:" Slider
WHERE
Editor toolbar → top row → slider next to „Brush:".
TECHNICAL
Determines the brush radius in screen points, range 5 to 200, default value 30. The red circle in the viewport redraws immediately while you drag, so you see the size before you paint. Because the radius applies in screen points rather than scene units, the same brush captures less material when zoomed in and more when zoomed out — zoom is thus your second precision control. The square bracket keys increase and decrease the radius in steps of five without you having to touch the slider.
ED6Selecting by Painting
WHERE
Viewport in editing mode → hold down the left mouse button and drag.
TECHNICAL
Each stroke checks the scene against the brush circle and adds the hits to the selection. A stroke without a modifier key replaces the previous selection — whatever was marked before is free afterward. The brush works against the view it finds when you put it down; it grabs exactly what you see at that moment. Without the „Surface" checkbox it reaches through the visible surface and also picks up what lies behind it.
ED7Shift, Option, and Command Key
WHERE
Editor toolbar → bottom row → hint „⇧ add · ⌥ subtract · ⌘ orbit · ⌫ delete".
TECHNICAL
The shift key adds the stroke to the existing selection, the option key subtracts it, and the command key hands the drag over to the camera instead of the brush. The moment you press the key is decisive: whether a drag becomes a brush stroke or a camera movement is decided by the app the moment you press the key, and it doesn't change during the drag anymore. If you press the command key only in the middle of a stroke, the stroke finishes painting first. The brush circle shows you the operating mode: a plus sign when shift is held, a minus with the option key, nothing with a replacing stroke.
ED8„Surface" Checkbox
WHERE
Editor toolbar → top row → „Surface" checkbox next to the brush slider.
TECHNICAL
Limits the stroke to the frontmost depth layer: of everything the brush hits, only the narrow band right at the visible surface stays marked, everything behind it drops out. This is the right setting when you're working on a wall or the floor and don't want the back of the object to come along. Access to deeper layers then runs through the slab (ED26). While „Surface" is on, no grazed splats are collected (ED13). Default: off.
ED9Select Everything Markable
WHERE
Edit menu → Select All (⌘A), with the viewport active.
TECHNICAL
Selects all Gaussians in the scene. If a slab is active, the command selects exactly the contents of the band and nothing beyond it — this is the fastest way to grab an entire layer without having to paint over it. In a text field, ⌘A remains the normal text command; the scene is only addressed when the viewport has focus. With the cylinder active, the command has no effect, because then the cylinder determines the selection (ED31).
ED10Clearing the Selection
WHERE
Viewport in editing mode → Escape key.
TECHNICAL
Clears the selection and grazed splats. Escape has a fixed priority order: if painting a reference region (ED21) is currently in progress, the first press ends that mode and nothing else. Only the next press clears the selection. If that's empty too, Escape closes the help overlay. This order is intentional — the key always undoes whatever was most recently switched on.
ED11The Counter in the Toolbar
WHERE
Editor toolbar → top row → between the brush checkboxes and the trash.
TECHNICAL
Shows the current selection as „N selected" and adds, when applicable, „+ M grazed" for grazed splats (ED13) and „· K reference" for the size of the reference region (ED21). The three numbers count three independent sets — a splat can be a reference without being selected, and vice versa. While the cylinder is active, the counter doesn't report your brush selection, but rather what the cylinder would currently keep.
Sharp Edges and Grazed Splats (ED12–ED15)
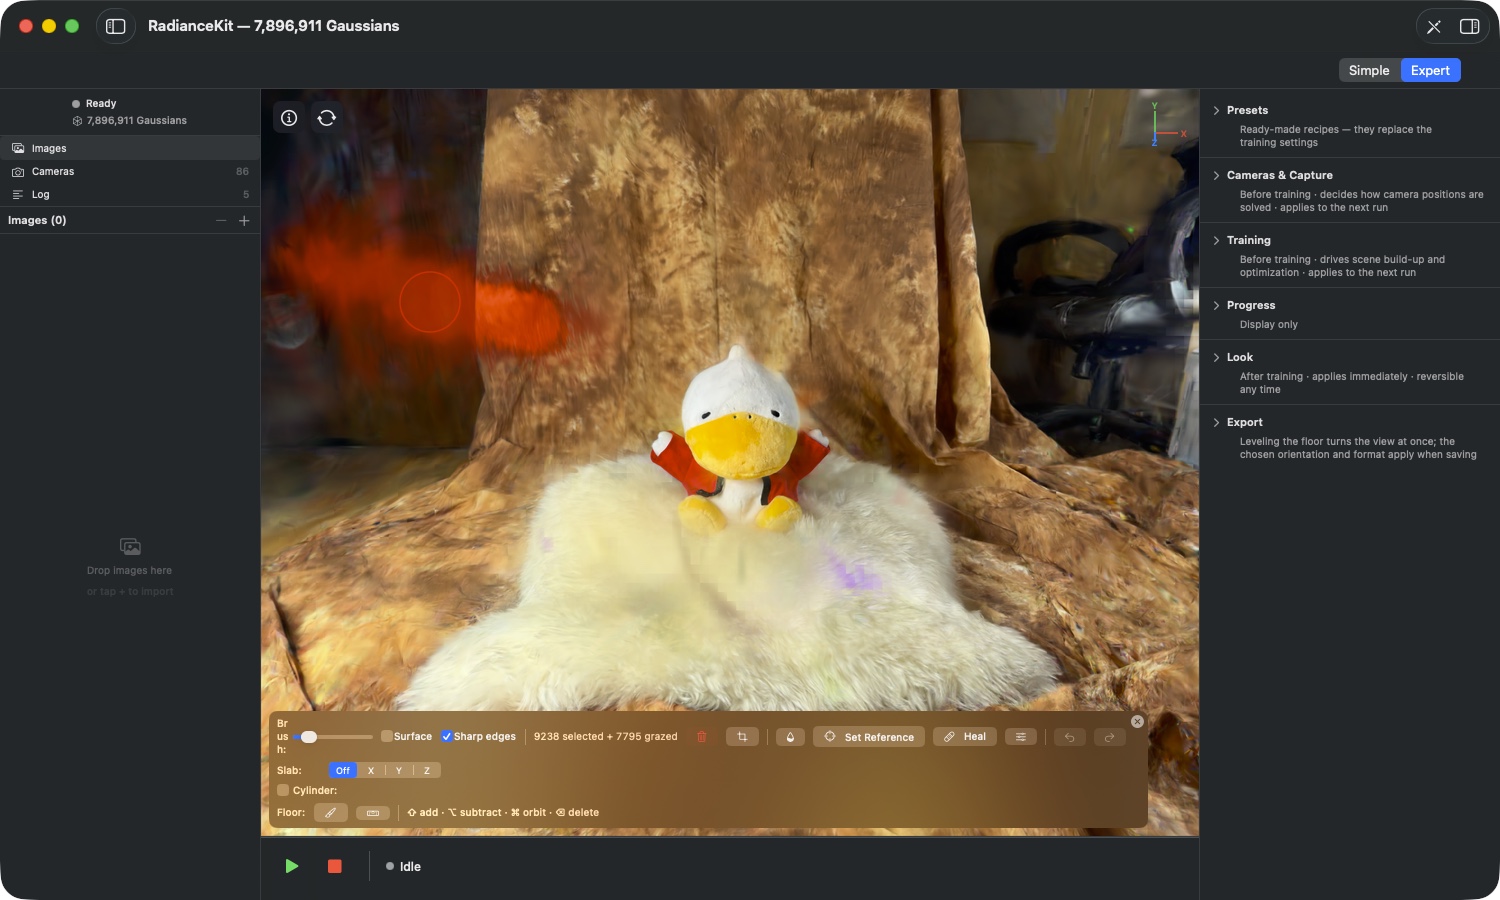
What you see in the image: Next to the 9,238 fully marked splats there are 7,795 grazed ones. These are Gaussians whose centre lies outside the brush, but whose extent the brush has grazed — typically long, needle-shaped splats that stick out of the object. They are more faintly coloured than the full hits, because they are handled differently.
ED12„Sharp edges" checkbox
WHERE
Editor toolbar → top row → „Sharp edges" checkbox.
TECHNICAL
Refines every straight cut: a splat that lies on the cutting plane is no longer kept or discarded as a whole, but split at the plane. This applies to cutting off grazed splats at the brush, to deletions in the slab, and to the cylinder crop. The cost is that the final splat count is only known once you apply — preview numbers such as „keeps N of M" count centre points and can therefore differ. Toggling this discards any grazed splats collected so far. Default: off, and the setting is not remembered when you quit the app.
ED13Grazed splats („grazed")
WHERE
Counter in the toolbar → addition „+ M grazed"; in the image the more faintly tinted splats.
TECHNICAL
Grazed splats are the ones whose extent the brush touched without capturing their centre. They are tracked separately and only collected with „Sharp edges" on, and are never collected while „Surface" is on, and never while painting a reference area. They can only be deleted. Heal and Desaturate deliberately only act on the full selection — both write colour into an entire splat, and a splat you've only grazed still mostly belongs to the object. Recolouring it would drag a streak across good material. The trash can makes this transparent and, depending on the situation, reads „Delete selected", „Delete grazed", or „Delete selected + grazed".
ED14The limit for fine cuts
WHERE
No control — applies silently while you paint.
TECHNICAL
Per editor session, the app remembers the frozen brush shapes that the grazed splats will later be split against. Their number is limited (4096). Once the limit is reached, the app no longer collects new grazed splats; ordinary marking, deleting, and everything else continues unchanged. In practice this is only reached with a very large number of individual short strokes in a row.
ED15What happens automatically after a sharp cut
WHERE
No control — runs along when you apply.
TECHNICAL
A sharp cut exposes two problems that the app handles right away. First, the newly created fragments don't simply take on the colour of the cut splat, but a colour weighted from the neighbours — otherwise the colour of a single long splat would smear across the whole edge. Second, splats that were exposed from the interior of the object by the cut are pulled towards the colours at the cut edge; these are places that no camera has ever seen before and that can therefore be arbitrarily colourful. Both only run within the area you've edited. The colour matching is written into the history as its own step, which is why the Edit menu shows the same undo entry twice after such a cut — the first undoes the recolouring, the second the cut.
Delete, Isolate, Desaturate (ED16–ED19)
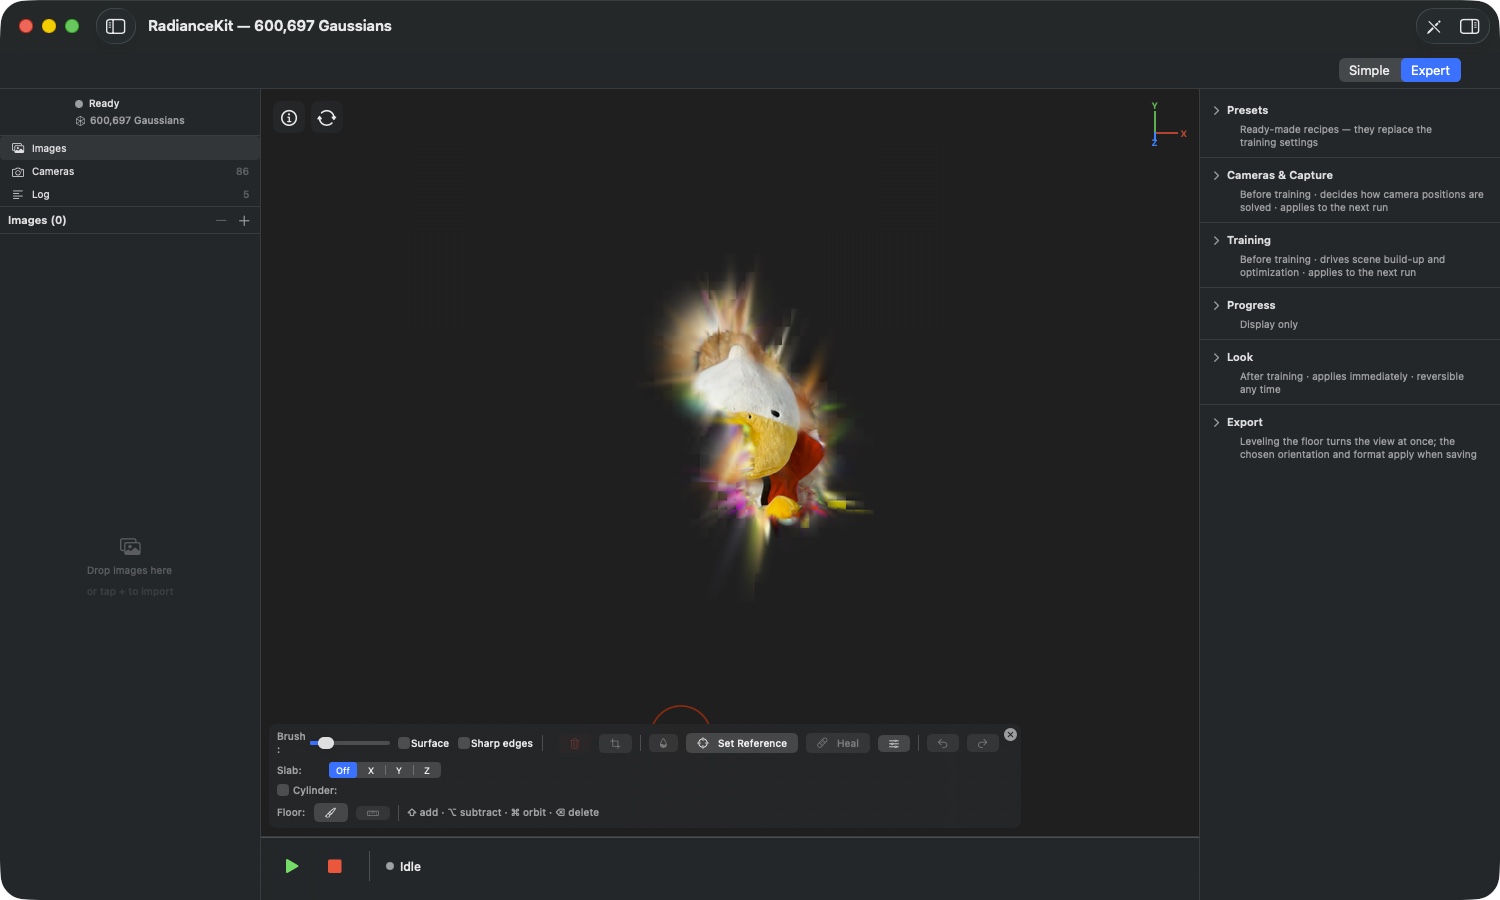
What you see in the image: Nearly eight million Gaussians have become 600,697 — the background is completely gone, the object stands free. At the cut surfaces you can see colorful spikes: splats that used to sit inside and are now exposed. Those are exactly what the automatic post-processing from ED15 tames, and what remains is a job for the heal brush (ED20).
ED16Delete selected
WHERE
Editor toolbar → trash can icon; or the X key, backspace, or delete key.
TECHNICAL
Permanently removes the selected Gaussians from the scene, and with "Sharp edges" enabled, additionally the cut-off parts of striped splats. The button is greyed out as long as there are neither selected nor striped splats, and while the cylinder is active. The keys only take effect when there is actually something to delete — so an accidental press of the backspace key can't cause any damage. The step goes into the edit history.
ED17Keep selected only
WHERE
Editor toolbar → scissors icon, right next to the trash can.
TECHNICAL
Reverses the logic: everything selected stays, everything else goes. This is the way to isolate an object instead of removing the background stroke by stroke — usually significantly less work. The button is greyed out if nothing is selected or the cylinder is active; if everything is selected, nothing happens, because a crop that would delete the entire scene isn't allowed. With "Sharp edges", edge cases show up as a notice dialog ("Nothing to crop", "Nothing would remain") instead of a greyed-out button. The crop goes into the history.
ED18Desaturate selected
WHERE
Editor toolbar → droplet icon.
TECHNICAL
Pulls the color of the selected Gaussians toward their own brightness — colorful becomes grey, without any splat disappearing or changing shape. It affects both the base color and the view-dependent color components, so the spot doesn't flash colorful again from any camera position. The splat count stays the same. There is no strength slider: one click desaturates completely. The button is greyed out if nothing is selected or the cylinder is active. Striped splats remain untouched (ED13).
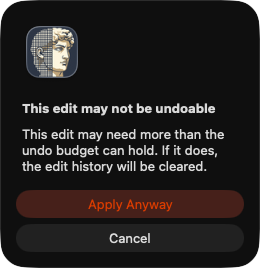
ED19When an edit is too large for the history
WHERE
Appears as a dialog when applying.
TECHNICAL
Before every edit, the app estimates how much memory the undo entry will need. If it doesn't fit the budget, the "This edit may not be undoable" dialog appears, with a note that the edit history will be cleared in this case, and the buttons "Cancel" and "Apply Anyway". There is a second, harsher case: if the available memory isn't even enough for the result itself, the app reports "This edit needs more memory" and aborts — there's no proceeding there, because the edit can't even be computed in the first place.
Healing (ED20–ED25)
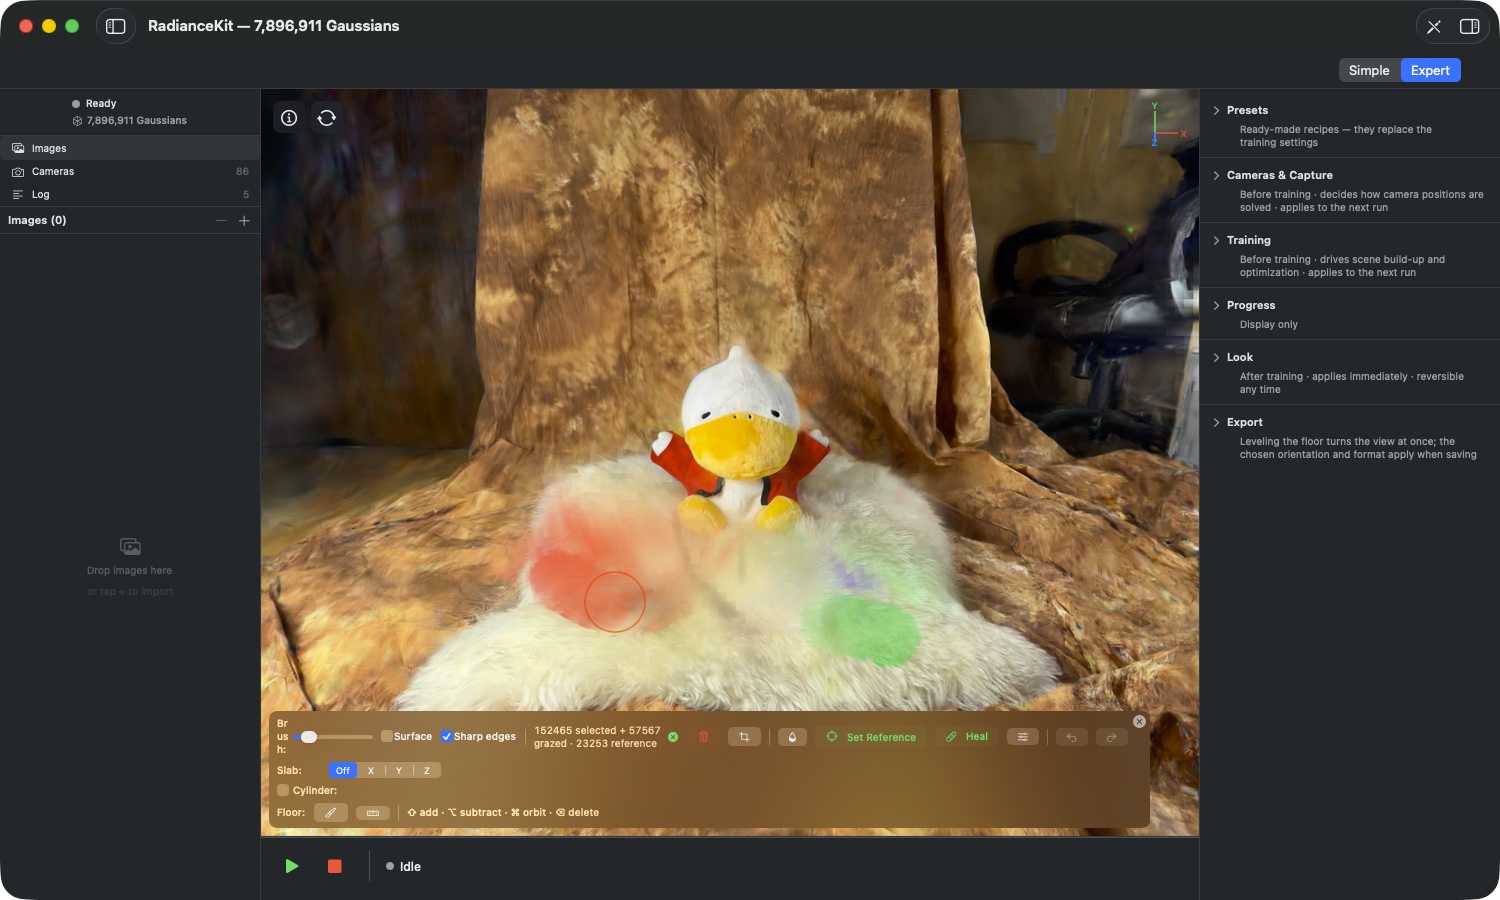
What it is: Healing is the alternative to deleting for spots that are off in color but structurally needed. Instead of removing material, it shifts the color of the marked splats — either toward their immediate surroundings or toward an area you designate yourself as a model. The shape remains untouched in both cases.
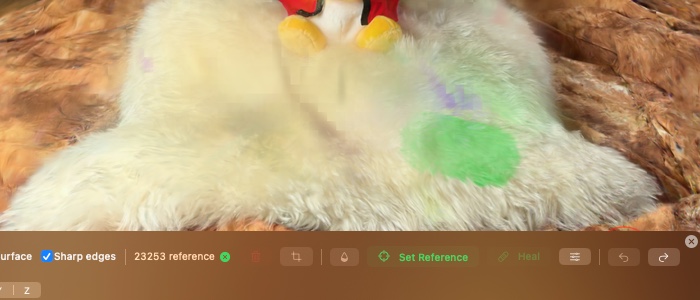
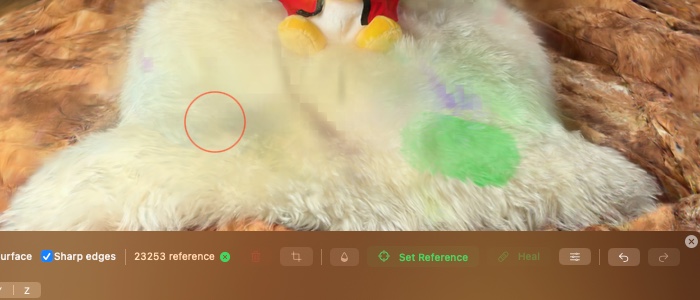
What you see in the image: The difference between the two shots is intentionally small. Healing is not a retouching tool that reinvents a spot — it shifts the base color, and the pattern underneath is fully preserved. That's exactly why it works so well on fur, plaster, or lawn, and why it's the wrong tool for a sharp material edge.
ED20Healing from the surroundings
WHERE
Editor toolbar → „Heal" button with band-aid icon.
TECHNICAL
Without a set reference area, every marked splat takes on the color of its unmarked neighbors, weighted by distance and much more strongly from the surroundings than from its previous own color. The search radius depends on the size of the respective splat. If the app finds fewer than three unmarked neighbors, it leaves the splat unchanged — you can't derive a color tone from one or two neighbors. The splat count stays the same; nothing is deleted. Striped splats are excluded (ED13). One click is one application; clicking multiple times pushes the color further toward the surroundings.
ED21„Set Reference" button
WHERE
Editor toolbar → between the droplet and „Heal", target-circle icon.
TECHNICAL
Switches what painting does: as long as this mode is active, your strokes don't fill the selection but the reference area, which is displayed in green. The stroke rules are the same — a plain stroke replaces, Shift adds, the Option key subtracts. The reference area is its own independent set: it survives clearing the selection and persists for the next healing operation. Escape ends the mode. Once a reference exists, „Set Reference" and „Heal" glow green, and the Heal button automatically switches to the reference-based path: the marked splats are shifted toward the reference's color palette. Only reference splats that are not themselves marked take effect. Painting a reference does not create any striped splats.
ED22Clearing the reference area
WHERE
Editor toolbar → small green X icon next to the counter; appears only when a reference is set.
TECHNICAL
Clears only the reference area; the selection remains unchanged. Afterward, the Heal button falls back to the surroundings-based behavior from ED20 and no longer glows green. The reference area also disappears on its own if you leave the editor or if the scene's content changes — a reference from an old point cloud would be meaningless afterward.
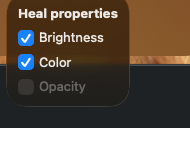
ED23Heal options: Brightness, Color, Opacity
WHERE
Editor toolbar → slider icon directly to the right of „Heal" → „Heal properties" selection box.
TECHNICAL
Three checkboxes decide which properties healing actually touches at all. Brightness transfers the brightness, Color the color tone, Opacity the opacity. Brightness and color take effect in both healing modes; both on corresponds to the full color transfer. If you turn off Brightness, only the color tone shifts — exactly the case when your clean reference area is brighter or darker than the problem spot and you don't want to import its brightness. Opacity is only available with a reference area set and is otherwise grayed out, because opacity without a model has no meaningful target. The settings are remembered; the default values are Brightness on, Color on, Opacity off.
ED24What the app reports back during healing
WHERE
Appears as a dialog after clicking „Heal".
TECHNICAL
Healing is talkative, because it could otherwise fail silently. „Nothing to heal" means that none of the marked splats had enough unmarked neighbors. „Reference too small" requires at least three reference splats that are not themselves marked. „Enabled properties already match" means that the selection already matches the reference in all enabled properties. For very large selections, a work budget may kick in; the app then states exactly how many splats could be processed and lets you choose between applying and canceling. Crucially: what gets applied is exactly what was computed beforehand — the app doesn't silently recompute anything after the dialog, and if the scene has changed in the meantime, it honestly aborts.
ED25Limits of healing
WHERE
No control element — applies to the entire section.
TECHNICAL
In its current version, healing deliberately has no live preview and no color picker: you can't enter a target color directly, only show an area. It affects the base color of the splats; fine view-dependent effects stay where they are. And it's not suited as a retouching tool across material boundaries — if you heal a spot that lies half on the lawn and half on the path, it blends both into a compromise that doesn't actually exist anywhere in reality.
Slab — the editing plane (ED26–ED30)
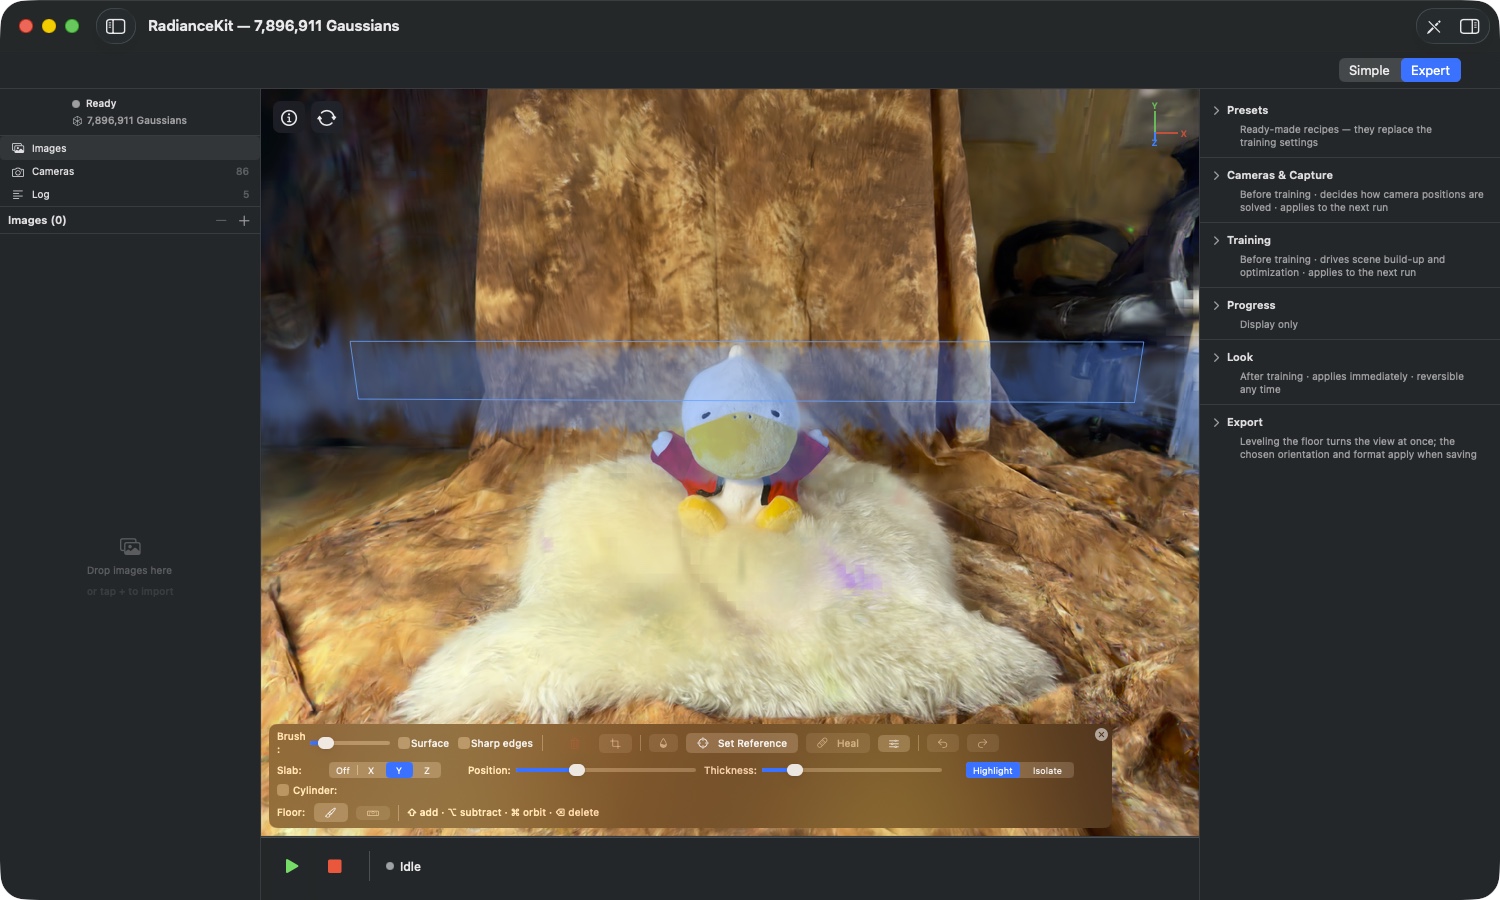
What it is: The Slab is a band that lies across the scene, perpendicular to one of the three world axes. While it's active, the brush only affects the area within this band. This is the answer to a problem everyone knows who has ever tried to get rid of clutter in the middle of a scene: you can't get to it without taking the front with it. The Slab exposes a layer, you clean it up, and then move it on.
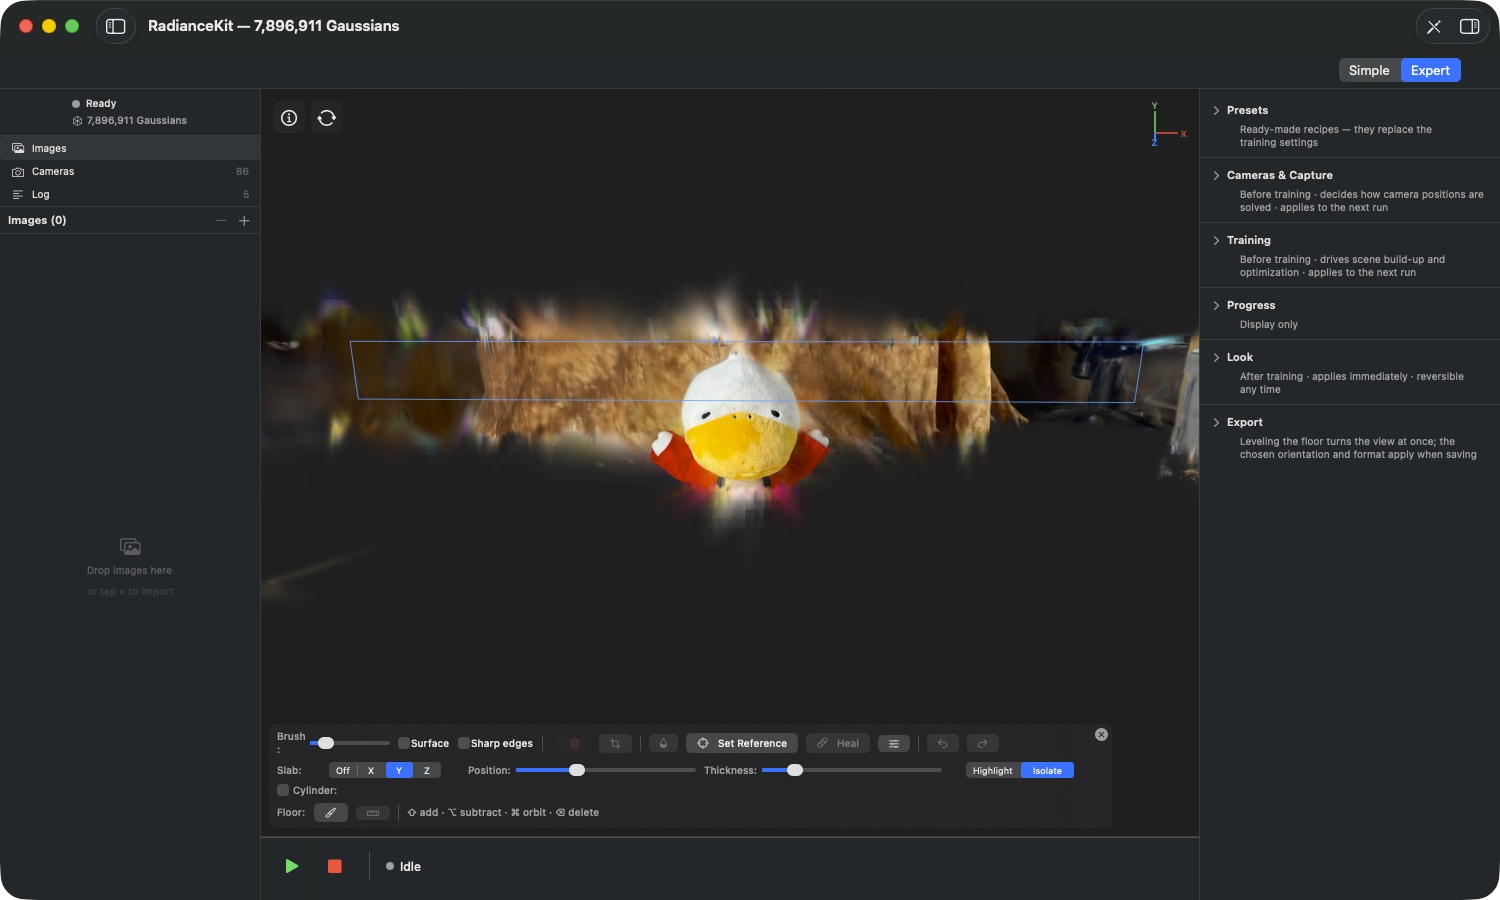
ED26Axis toggle „Slab:"
WHERE
Editor toolbar → second row → „Slab:" with Off | X | Y | Z.
TECHNICAL
Selects the world axis to which the band is perpendicular. This means the axes of the aligned world — the same ones shown by the axis indicator at the top right (ED35). At Off, the Slab is disabled and the sliders disappear. The app remeasures the extent of the scene when it's switched on, using robust quantiles rather than the outermost points: a single distant fragment shouldn't stretch the band so far that the sliders become useless in the middle. The Slab only affects the editing mode; a forgotten Slab can't clip either the normal view or an export.
ED27„Position:" slider
WHERE
Editor toolbar → Slab row → „Position:" slider (only appears once an axis is selected).
TECHNICAL
Moves the band along the selected axis from one end of the scene to the other. At both ends the slider has a special behaviour: at the very left the band opens downward, at the very right upward — it then extends indefinitely, and the open side is drawn as a dashed rectangle instead of a solid one. This is the way to reach clutter hanging far below the floor or high above the scene, which a closed band would never reach.
ED28„Thickness:" slider
WHERE
Editor toolbar → Slab row → „Thickness:" slider.
TECHNICAL
Determines how much of the scene the band covers, measured against the extent along the selected axis. Default value 15 percent. The app never lets the band collapse all the way to zero, so that an empty layer — in which the brush no longer hits anything — can't occur unnoticed.
ED29Highlight and Isolate
WHERE
Editor toolbar → Slab row → Highlight | Isolate toggle.
TECHNICAL
A purely visual decision — the band itself and the selection don't change. Highlight tints the band content blue-cyan while the rest of the scene continues to render normally; you keep the spatial context. Isolate draws only the band content, everything else stays black. This lets you see the layer without any occlusion from front or back, which makes finding free-floating fragments much easier. Default: Highlight.
ED30What every band change does to the selection
WHERE
No control — happens with every adjustment of axis, position, or thickness.
TECHNICAL
Every change to the Slab thins an existing selection down to the new band content and discards the striped splats. This is intentional: a Slab that left part of the selection standing outside the band would suggest a protection that doesn't actually exist — you would then delete something you no longer see in the band at all. The counter drops visibly with such an adjustment accordingly. The blue-cyan wireframe draws the band surfaces and continuously follows the camera, even while you're dragging a slider.
Cylinder Crop for Drone Scenes (ED31–ED35)
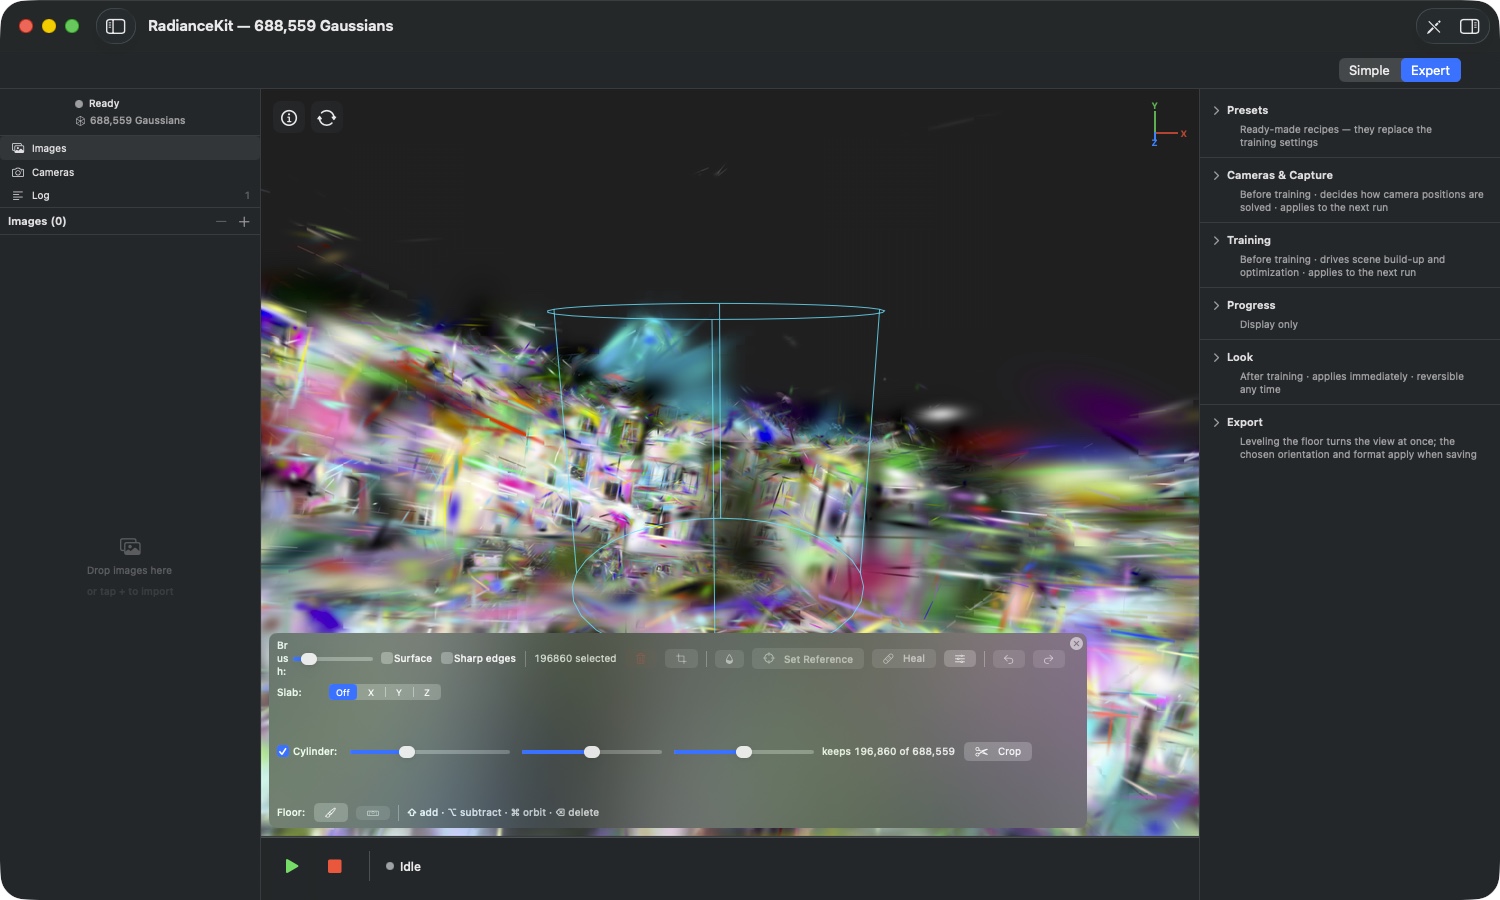
What it is: Drone footage has a recurring pattern: in the middle stands what interests you, and all around lies landscape that just came along for the ride and needlessly bloats the export. The cylinder cuts exactly this pattern — a vertical, upward- and downward-unbounded cylinder; everything inside stays, everything outside falls away.
ED31Checkbox "Cylinder:"
WHERE
Editor toolbar → third row → checkbox "Cylinder:".
TECHNICAL
Turns on the cylinder together with the wireframe preview. As long as it's active, it owns the selection: the brush is ignored, a running reference mode is ended, and every button that needs a painted selection — trash, scissors, dropper, "Set Reference", "Heal" — is grayed out. The reason is unambiguity: the counter should always name exactly what the crop would keep, not a mix of cylinder and brush strokes. Turning it on and off each clears the selection.
ED32Radius, X, and Z Sliders
WHERE
Editor toolbar → cylinder row → three sliders.
TECHNICAL
The radius determines the extent, X and Z shift the axis within the plane. All three work relative to the scene's extent, which the app measures when turning it on — again via robust quantiles, so a single far-off scrap of debris doesn't push the cylinder into empty space from the start. Every slider movement recalculates the number of splats that lie inside; for large scenes this runs batched, so that dragging a slider doesn't recompute every intermediate position.
ED33The "keeps N of M" Display
WHERE
Editor toolbar → cylinder row → label to the left of the Crop button.
TECHNICAL
Continuously states how many Gaussians the current cylinder would keep and how many the scene has in total. What's counted are splat centers. With "Sharp edges" turned on, splats on the cylinder surface are additionally split when applying — then the final number differs from the preview. The note on the control says this explicitly, instead of claiming an accuracy the preview doesn't have.
ED34The "Crop" Button
WHERE
Editor toolbar → cylinder row → "Crop" button with scissors icon.
TECHNICAL
Applies the crop: everything outside the cylinder falls away. In doing so the scene moves onto the cylinder axis — a crop at the edge of a drone scene would otherwise leave the result far next to the camera's pivot point. Undo reverses this shift symmetrically. After an applied crop, the cylinder switches itself off, so you can continue working right away. Because a cylinder crop routinely removes millions of splats, the memory dialog from ED19 appears first if the undo entry doesn't fit into the budget.
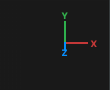
ED35The Axis Gizmo Top Right
WHERE
Viewport → top right corner.
TECHNICAL
Shows the three positive axes of the aligned world: X red, Y green, Z blue. The axes foreshorten in perspective when they point away from you — this is how you tell which direction goes backward. The gizmo is a pure display and can't be clicked to rotate the camera. Its actual usefulness lies with the slab: the letters in the axis switcher refer to exactly these axes.
Marking the Floor and Aligning the Scene (ED36–ED37)
Crooked scenes are the norm when shooting handheld — the reconstruction knows nothing about gravity. The two buttons in the floor row straighten this out in two steps: first mark the floor, then align to it.
ED36Mark Floor
WHERE
Editor toolbar → fourth row → "Floor:" → left button with the brush icon. The same workflow is also available in the Export section of the Inspector.
TECHNICAL
Prepares floor marking: an active cylinder is switched off and the brush is set to "Surface". Both are necessary so that you only pick up the floor surface — a through-reaching brush would sweep up the back of the object or a wall behind it when you paint over the floor, which would distort the plane the app is about to fit.
ED37Align to Marked Floor
WHERE
Editor toolbar → "Floor:" → right button with the spirit-level icon.
TECHNICAL
Fits a plane through the marked Gaussians and rotates the scene so that this plane lies horizontal. The alignment is oriented upward and applies both to the view and to file exports — so the result also stands upright in other programs. The button requires at least 32 marked Gaussians and is locked while a cylinder is active. If the marked area is too uneven to reliably derive a plane from it, the app refuses the rotation instead of tilting the scene. It is a pure view and output transformation: the positions of the splats stay as they are, and your editing history remains valid. "Reset to auto" in the Export section takes you back to the previous alignment.
Undo and Redo (ED38–ED39)
ED38Undo and Redo
WHERE
Menu Edit → top two entries (⌘Z, ⇧⌘Z); Editor toolbar → the two arrow icons on the right.
TECHNICAL
Undoes or redoes the most recently applied edit. Deletions, crops, desaturations, and healings are undone — the menu entries explicitly name the step, so you can read in the menu what's about to be undone. ⌘Z behaves depending on what currently has focus: In the viewport it undoes an edit, in a text field it's the familiar text undo. This is intentional — an ⌘Z in a preset's name field should never undo a cut in the scene. If the arrows in the toolbar are grayed out, the history on that side is empty.
ED39Why there is no fixed number of undo steps
WHERE
No control — affects all edits.
TECHNICAL
The edit history isn't limited to a number of steps, but to an amount of memory that depends on your computer's memory. How many steps fit within it therefore depends on how large your edits were: many small deletions add up to a deep history, a single crop across millions of splats can exhaust the budget on its own. If an entry doesn't fit at all, it isn't recorded and the history is cleared — the dialog from ED19 warns you about this before anything happens. If the system's memory runs low, the app shortens the history on its own, in the most extreme case completely. In addition, the history is cleared when you reload a scene, start or cancel a new training run, and when you apply a Look — in all these cases the point cloud is different afterward, and an old undo step would no longer fit.