RadianceKit Manual
Chapter 1 — Menu Bar
The RadianceKit menu bar organizes every function that doesn't sit directly in the main window or the Inspector. These are mainly actions that affect the whole scene (Open, Save, New Project), control training (Start, Pause, Continue), operate the viewport (auto-rotation, screenshot, background color) and trigger exports to various 3D and media formats. On top of that there are jump points to all helper windows (User Guide, Pareto Dashboard, Holdout Analysis, BayesOpt Console).
Keyboard shortcuts are listed to the right of each menu entry. Conventions: ⌘ is the Command key (Apple key), ⇧ is Shift, ⌥ is Option (Alt), and ⌃ is Control. Example: ⇧⌘T means Shift+Command+T. All shortcuts documented here are additionally listed in a dedicated overview window under Help → Keyboard Shortcuts (⌘/).
The following 42 entries are documented in inventory order (M1–M42), grouped by the top-level menu they belong to. All entries have been verified against the current code state in (lines 175–477). No entries have been removed or superseded relative to the inventory; a new Edit menu entry (Cmd-Z for "Remove Image") is provided by the system NSUndoManager framework and therefore does not appear in the RadianceKitApp code (see note at the end of the chapter).
File Menu
The File menu replaces Apple's standard "New Window" entry with project-specific actions. It covers loading/saving scenes, a dynamic Recent list, workspace import, and a hard reset to an empty state.
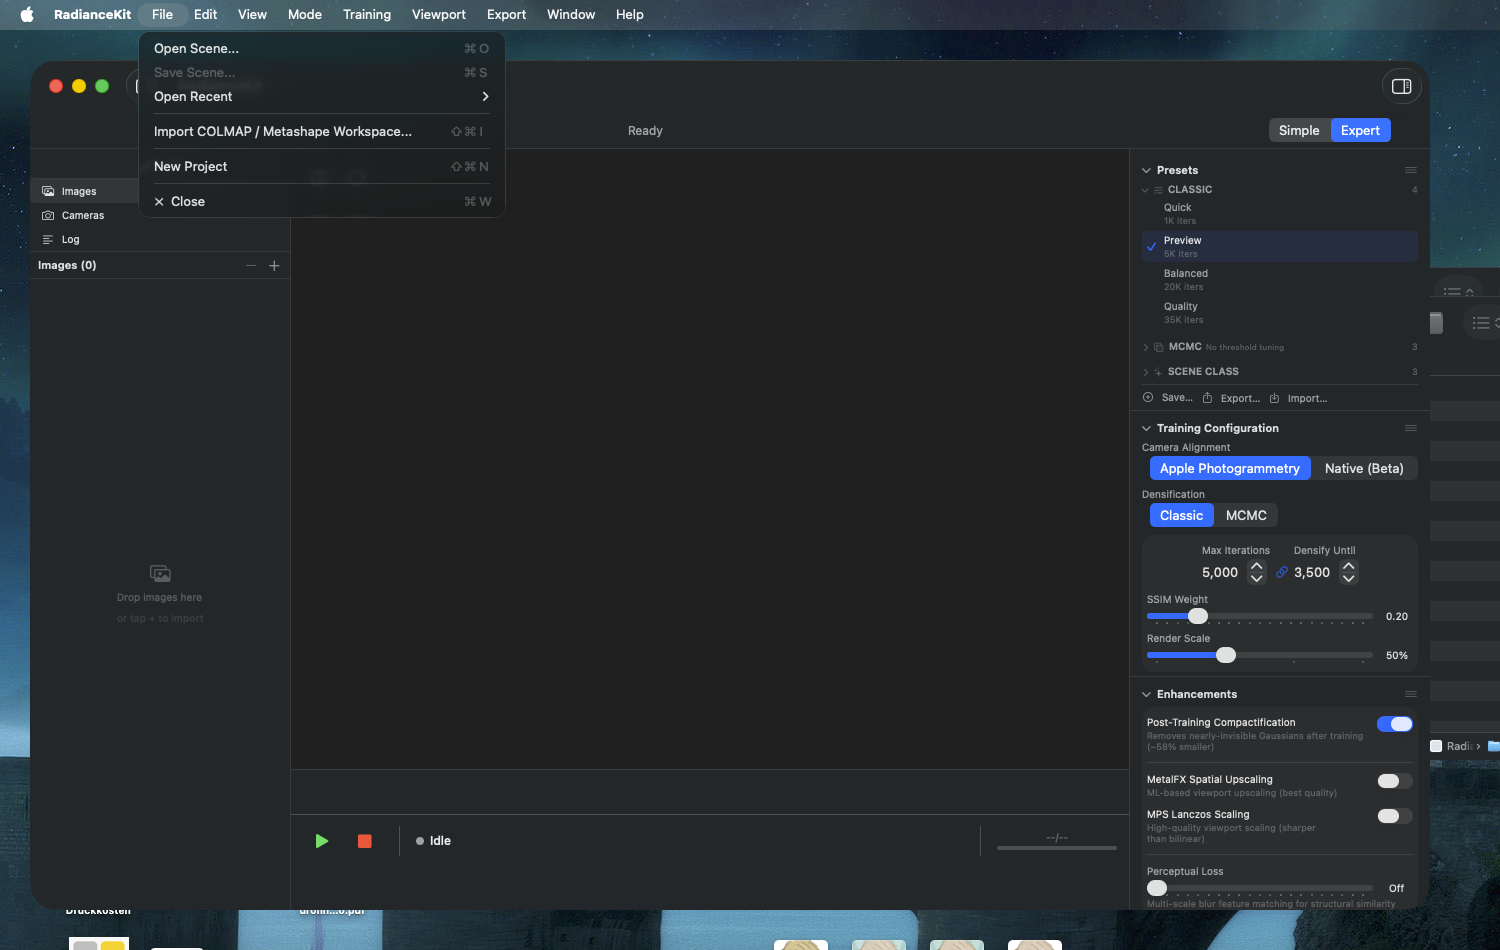
M1File > Open Scene…
WHERE
Menu bar → File → Open Scene… (⌘O).
TECHNICAL
Opens a file dialog for the formats RadianceScene bundle, .ply, .splat and .spz. Single selection, can show both files and directories (for the bundle format). After a successful selection the path is added to the Recent list and the scene is loaded asynchronously — the previous one is replaced and the training pipeline is initialized with the loaded state. PLY/SPZ/Splat files are read via their respective format loaders; the .radiancescene bundle is a directory with manifest, cloud snapshot, and SfM results.
M2File > Save Scene…
WHERE
Menu bar → File → Save Scene… (⌘S).
TECHNICAL
Opens a file save dialog with the content type RadianceScene bundle and a prefilled filename scene.radiancescene. Writes a directory package with manifest.json, the serialized Gaussian cloud (PLY snapshot) and a dump of the SfM result, so that continue training also works after reopening. The entry is disabled as long as no Gaussians exist yet. Does not save to the training-logs path but to wherever the save dialog points — typically under ~/Documents/.
M3File > Open Recent > [scene names]
WHERE
Menu bar → File → Open Recent → (list).
TECHNICAL
Dynamic submenu generated from a list of recently opened paths (stored in the settings). Each list entry is labeled with the filename and loaded on click. If the list is empty, the disabled label "No Recent Scenes" appears instead. Apple-style, the list holds the N most recently opened scenes — the limit is enforced when writing to the settings, not in the menu builder itself.
M4File > Open Recent > Clear Recent
WHERE
Menu bar → File → Open Recent → Clear Recent.
TECHNICAL
Clears the Recent list in the settings. Takes effect immediately, without a confirmation dialog. The entry only appears in the submenu when there are actually entries in the Recent list (it sits below a divider after the paths).
M5File > Import COLMAP / Metashape Workspace…
WHERE
Menu bar → File → Import COLMAP / Metashape Workspace… (⇧⌘I).
TECHNICAL
Opens a folder picker. Expects a folder with the COLMAP workspace layout (e.g., sparse/0/cameras.{bin,txt} plus images/). After selection, a workspace pre-check is run — it detects the three layouts (sparse/0/, sparse/, root) and whether the reconstruction is binary (cameras.bin) or in ETH3D text form (cameras.txt). On success the workspace is imported; otherwise only a warning appears in the app log. See also Chapter 9 "SfM Backends", Q6 for the full pipeline logic.
M6File > New Project
WHERE
Menu bar → File → New Project (⇧⌘N).
TECHNICAL
Checks whether unsaved work is present. If so, a confirmation dialog appears before anything gets lost. If there's nothing to save, the reset runs immediately — it clears imported images, the SfM result, the Gaussian cloud, training state and all dependent UI indicators. Note: A user-created preset library is preserved because it lives in the app settings and not in the project state.
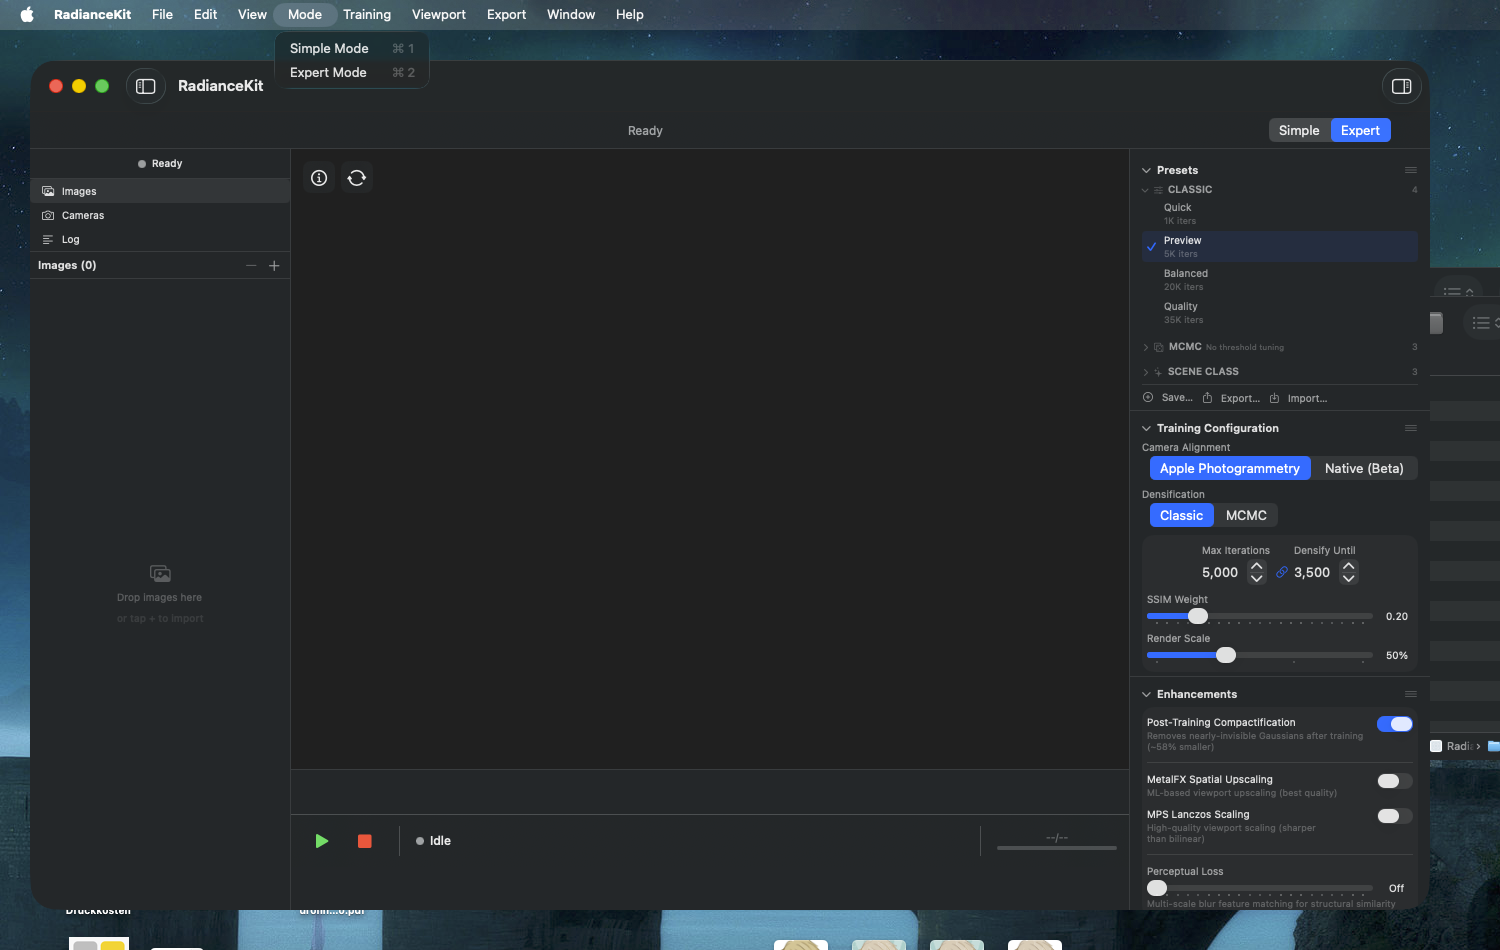
Mode Menu
Two simple switches between the guided Simple Mode (wizard-like, 4 steps) and the full Expert Mode (classic Inspector layout with all controls).
M7Mode > Simple Mode
WHERE
Menu bar → Mode → Simple Mode (⌘1).
TECHNICAL
Switches the app state to Simple Mode. The main area of the app then shows the guided workflow instead of the Expert layout. The mode state is stored in the settings (see S1 "Default Mode" in Chapter 3 Settings).
M8Mode > Expert Mode
WHERE
Menu bar → Mode → Expert Mode (⌘2).
TECHNICAL
Switches the app state to Expert Mode. This brings up the full Inspector layout with all sections (Presets, TrainingConfig, Enhancements, Metrics, LossChart, ProjectNavigator). In Expert Mode all training parameters, COLMAP picker, mid-compact toggles, and diagnostics are accessible. The live preview also only works in this mode.
Training Menu
Four actions around the training run: start, pause, cancel, and extend by a fixed iteration count. All three Continue entries are IAP-gated (not clickable in the free trial version).
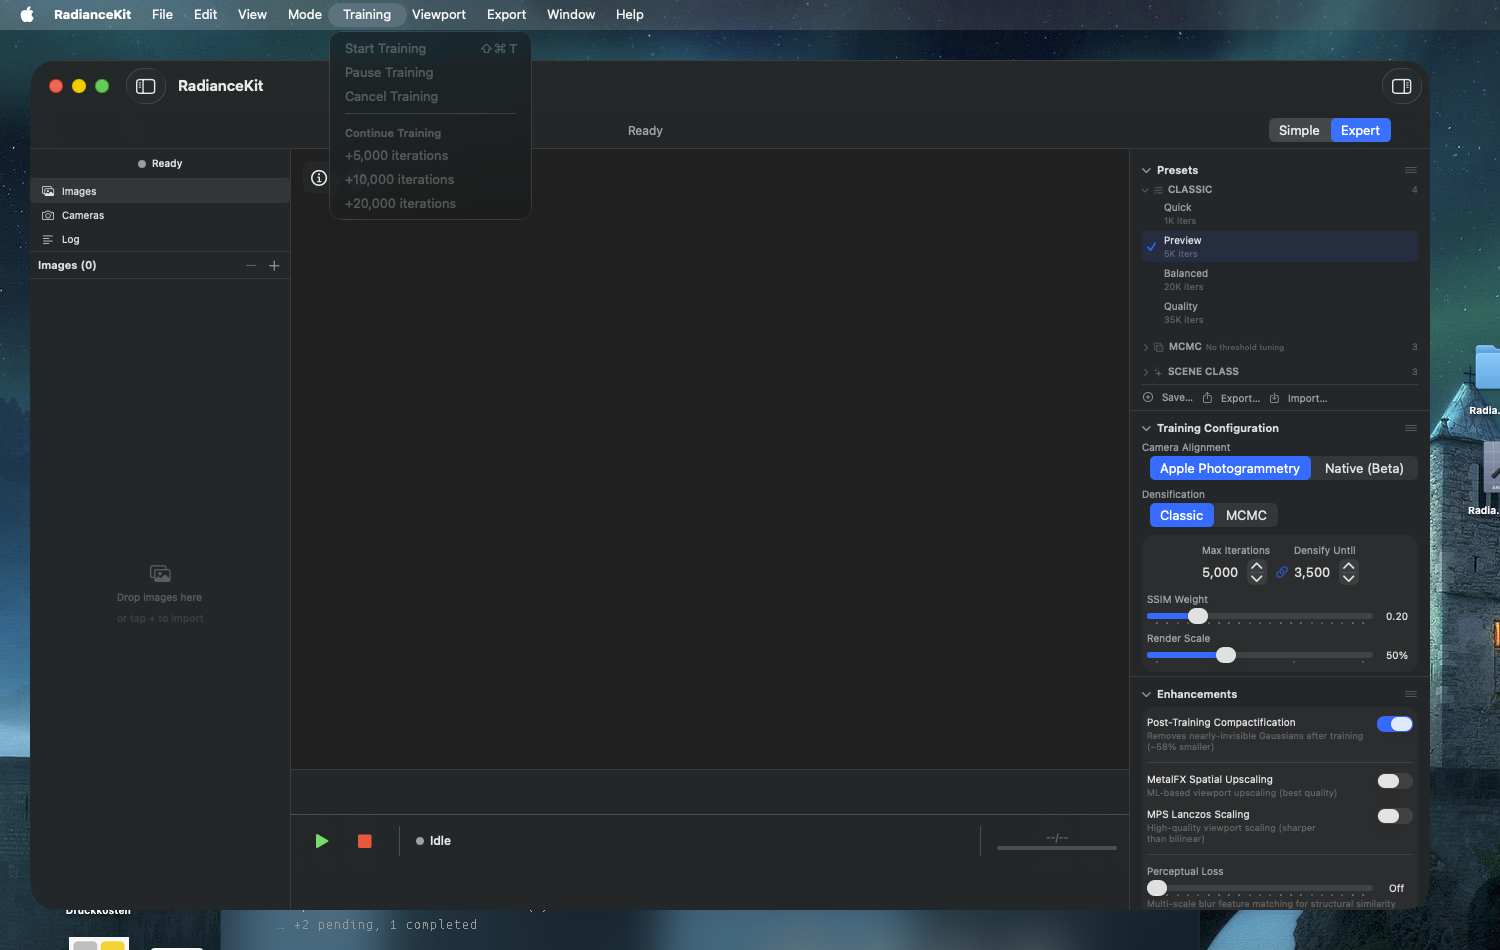
M9Training > Start Training
WHERE
Menu bar → Training → Start Training (⇧⌘T).
TECHNICAL
Starts the training pipeline asynchronously. Prerequisite: an SfM result exists and no other pipeline is currently running. Both conditions block the entry if not met. On start, the current configuration values are read, a new JSONL log under ~/Documents/RadianceKit/Logs/training_YYYY-MM-DD_HHmmss.jsonl is created, and depending on the strategy choice the classic or the MCMC path is taken. The training state switches from "idle" to "training".
M10Training > Pause Training
WHERE
Menu bar → Training → Pause Training.
TECHNICAL
Pauses the running training. Only enabled when the training state is "training". Pausing stops the iteration loop at the next safe sync point, keeps the full GPU state (Gaussian buffers, optimizer moments, scheduler position) and switches to "paused". Resume happens by pressing it again (the entry title is static — but the app toggles between Pause/Resume in the actual logic). Paused trainings do not survive an app quit; in that case save the scene instead and extend it later via a Continue Training entry (M12–M14).
M11Training > Cancel Training
WHERE
Menu bar → Training → Cancel Training.
TECHNICAL
Cancels the running training. Active when the training state is not "idle". Sets the cancel flag in the training engine, which cleanly ends the iteration loop at the next sync point, writes the final summary entry into the JSONL log, and resets the state to "idle". The cloud trained so far is preserved (can be saved or exported) but marked as "cancelled".
M12Training > Continue Training > +5,000 iterations
WHERE
Menu bar → Training → Continue Training → +5,000 iterations.
TECHNICAL
Continues training by 5,000 iterations. Active when a completed training run is resumable and the full version is unlocked. Resumability holds when a completed training run exists and the full optimizer state is still in memory. On continue, the Adam moments and the LR scheduler are carried forward, so the continuation behaves like a continuous 25K/45K/60K run rather than a restart. The JSONL log gets a new config entry with the incremental setup. Only available in the full version.
M13Training > Continue Training > +10,000 iterations
WHERE
Menu bar → Training → Continue Training → +10,000 iterations.
TECHNICAL
Identical to M12, but with 10,000 additional iterations. Same prerequisites, same LR scheduler path. Recommended when the initial training was run with a mid-tier preset and you want to see a significant quality improvement without restarting the run from scratch.
M14Training > Continue Training > +20,000 iterations
WHERE
Menu bar → Training → Continue Training → +20,000 iterations.
TECHNICAL
Identical to M12 / M13, but with 20,000 additional iterations. The largest preset continue jump. For MCMC training this is often what makes the difference between "okay" and "benchmark-grade"; for Classic, beyond 35–40K experience shows little is added.
Viewport Menu
Controls the 3D viewport: Edit Mode for Gaussian selection and cleanup, camera controls (auto-rotation, playback, recording), screenshot, background color, and reset.
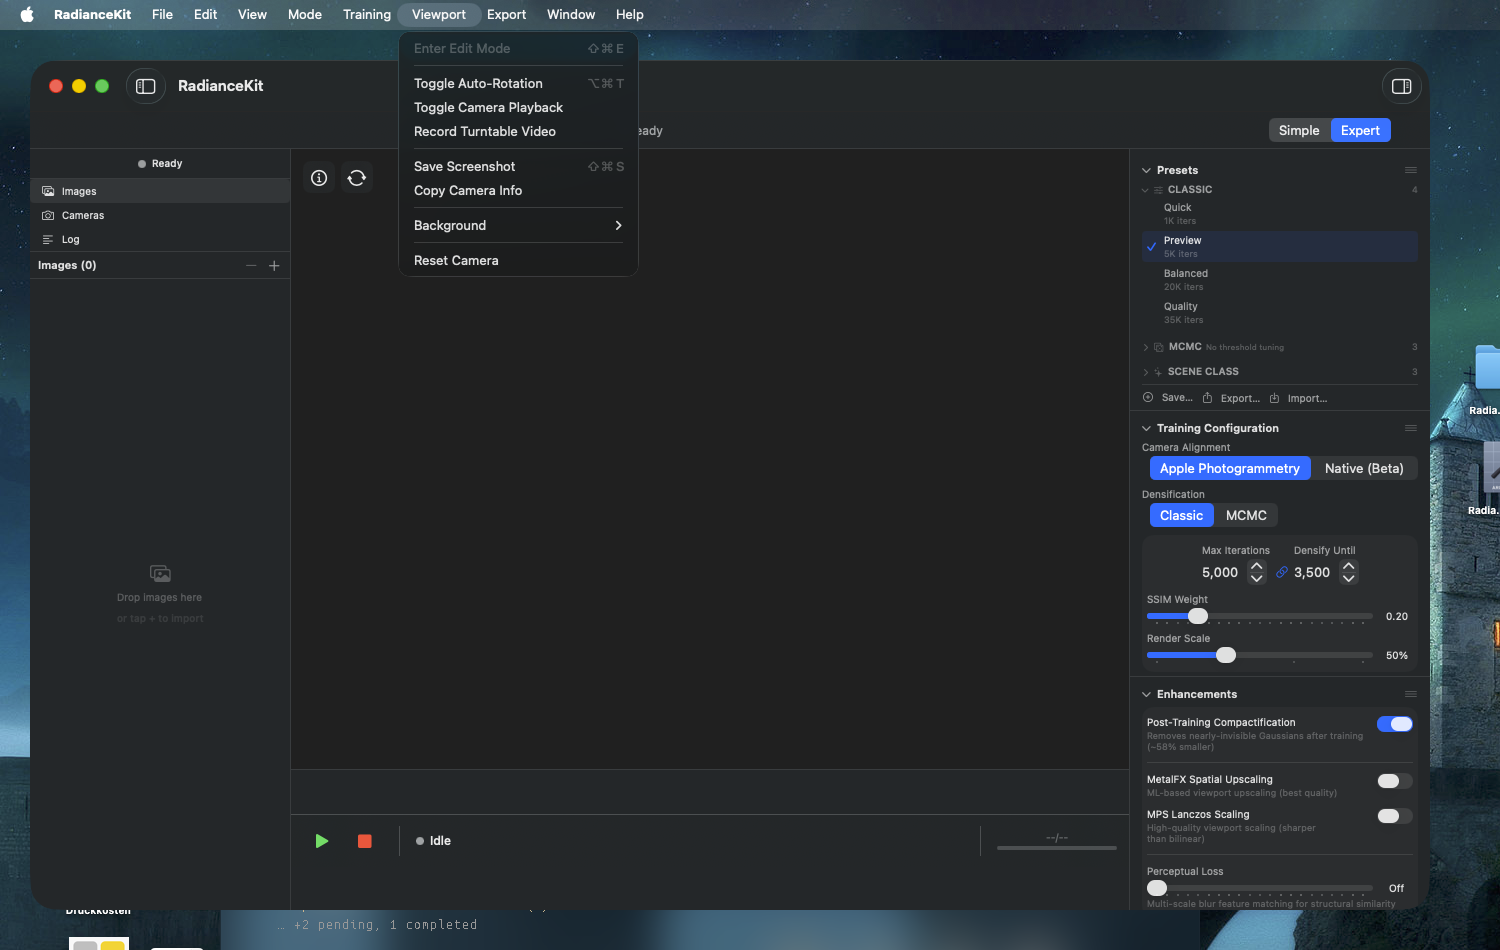
M15Viewport > Enter/Exit Edit Mode
WHERE
Menu bar → Viewport → Enter Edit Mode (or "Exit Edit Mode", depending on state). ⇧⌘E.
TECHNICAL
The entry title is dynamic and shows "Exit Edit Mode" or "Enter Edit Mode" depending on the state. On press, Edit Mode is toggled on the viewport renderer. On leaving Edit Mode, the current selection is also reset. Edit Mode activates click selection on Gaussians, box selection, and the deletion of marked Gaussians (see the editor area of the UI). Disabled as long as no viewport renderer is attached.
M16Viewport > Toggle Auto-Rotation
WHERE
Menu bar → Viewport → Toggle Auto-Rotation (⌘⌥T).
TECHNICAL
Toggles the continuous rotation of the viewport camera around a vertical axis through the scene center on or off. Axis and speed come from the camera control configuration. Auto-rotation is a pure viewport effect and influences neither training nor recording — if you use the turntable video recorder in parallel (M18), auto-rotation delivers exactly the path the recorder captures.
M17Viewport > Toggle Camera Playback
WHERE
Menu bar → Viewport → Toggle Camera Playback.
TECHNICAL
Toggles camera-path playback. If a recorded camera path exists (e.g., from a previous recording or because a transforms.json was loaded), the path plays back — the viewport camera no longer moves in response to mouse/trackpad input but reproduces the trajectory frame by frame. Pressing again pauses playback.
M18Viewport > Record Turntable Video
WHERE
Menu bar → Viewport → Record Turntable Video.
TECHNICAL
Toggles viewport recording. On first press, a frame recording starts to a temporary path; on second press, the recording is finished, encoded, and written to an MP4 path (the path is requested via a save dialog). Unlike Export → Media → Orbit Video (M31), which produces a fixed 360° path at a configurable duration, the turntable recorder captures live what you see in the viewport — so you can also record a manual camera move.
M19Viewport > Save Screenshot
WHERE
Menu bar → Viewport → Save Screenshot (⇧⌘S).
TECHNICAL
Captures a single viewport frame at full render resolution (so not the window pixel layout but the full render-target contents) as a PNG file. The path is requested via a save dialog. The background color (M21–M23) is baked in. MetalFX/MPS upscaling settings from the Enhancements (see I27/I28) take effect if active — the screenshot then shows the upscaled output.
M20Viewport > Copy Camera Info
WHERE
Menu bar → Viewport → Copy Camera Info.
TECHNICAL
Reads the current viewport camera pose (position, look-at point, up vector) and the FOV values from the camera control and writes them as multi-line text to the clipboard. The format is human-readable (label = value per line), not JSON. Handy for reproducing a specific view for debugging purposes or sharing with support.
M21Viewport > Background > Dark Gray
WHERE
Menu bar → Viewport → Background → Dark Gray.
TECHNICAL
Sets the viewport background color to a dark gray (RGB 0.1/0.1/0.1). The renderer uses this color as the background against which the Gaussians are composited. The default color at app start is controlled by the settings option S3 "Default Viewport Background".
M22Viewport > Background > Black
WHERE
Menu bar → Viewport → Background → Black.
TECHNICAL
Sets the viewport background color to pure black (RGB 0/0/0). Helps when the scene has many bright floaters and you want to identify them, or for marketing material with a dark look-and-feel.
M23Viewport > Background > White
WHERE
Menu bar → Viewport → Background → White.
TECHNICAL
Sets the viewport background color to pure white (RGB 1/1/1). Useful when the scene has predominantly dark content and you want to see dark floaters (typical outdoor background noise).
M24Viewport > Reset Camera
WHERE
Menu bar → Viewport → Reset Camera.
TECHNICAL
Resets the viewport camera, leaves the training-camera view and stops auto-rotation. That puts the camera back at the initial position (typically: in front of the scene, looking slightly from above), auto-rotation is off, and if the renderer was showing the training camera (one of the SfM poses), it goes back to the free camera.
Export Menu
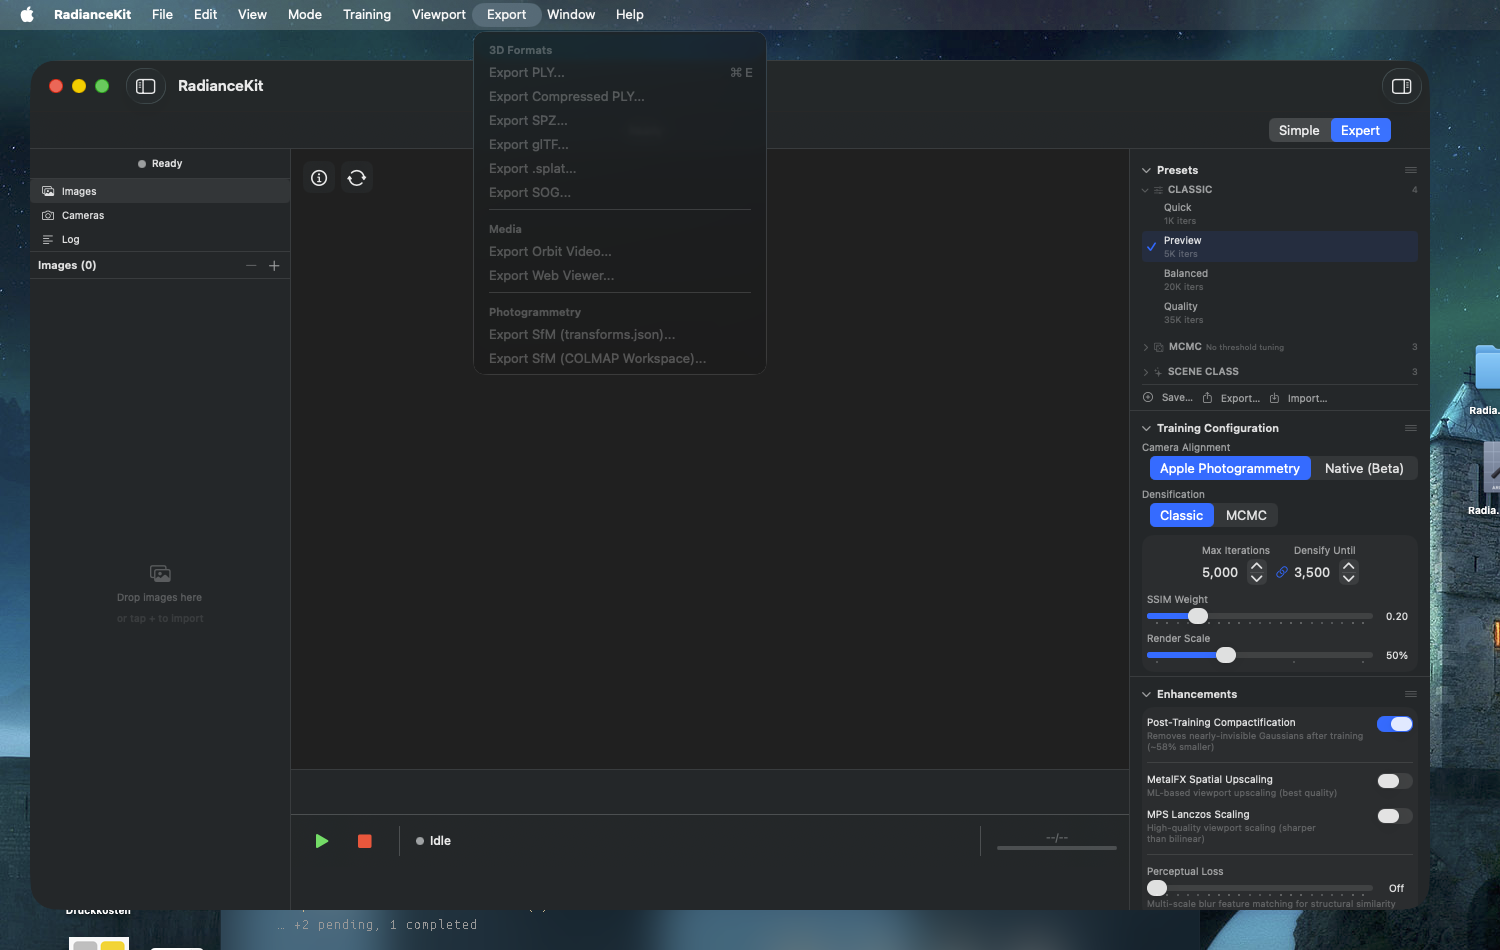
Eight export targets plus two photogrammetry exports, grouped in three sections (3D Formats, Media, Photogrammetry). The first six are built via a common helper routine that each opens a save dialog and registers the export with the format catalog. The photogrammetry entries have individual logic. All photogrammetry exports and some 3D exports are only available in the full version.
M25Export > 3D Formats > Export PLY…
WHERE
Menu bar → Export → 3D Formats → PLY (⌘E).
TECHNICAL
Opens a save dialog with default filename gaussians.ply. On OK the current Gaussian cloud is written into the standardized ASCII/binary PLY format — compatible with SuperSplat, PolyCam, PlayCanvas and all common 3DGS viewers. Full SH coefficients, full precision (Float32 per field). File size often several hundred MB at ≥ 500K Gaussians.
M26Export > 3D Formats > Export Compressed PLY…
WHERE
Menu bar → Export → 3D Formats → Compressed PLY.
TECHNICAL
Writes the Gaussian cloud in the compressed-PLY format with custom quantization of the position, scale, rotation, and SH fields. 5–10× smaller files than the uncompressed PLY (M25) with minimal visual loss. Compatible with SuperSplat (which reads the compressed-PLY standard) and PlayCanvas. Default filename gaussians_compressed.ply.
M27Export > 3D Formats > Export SPZ…
WHERE
Menu bar → Export → 3D Formats → SPZ.
TECHNICAL
Writes the Gaussian cloud in the SPZ format — the compressed splat format published by Niantic with aggressive quantization (~90 % smaller than uncompressed PLY). Mainly optimized for web viewers and mobile apps. Compatible with Niantic Splatt3R, gsplat.js, and the Niantic browser viewer.
M28Export > 3D Formats > Export glTF…
WHERE
Menu bar → Export → 3D Formats → glTF.
TECHNICAL
Writes a .glb file (binary glTF) with the KHR_gaussian_splatting extension. Standard-conformant, suitable for pipelines that use glTF engines like Babylon.js or Three.js and implement the KHR_gaussian_splatting extension.
M29Export > 3D Formats > Export .splat…
WHERE
Menu bar → Export → 3D Formats → .splat.
TECHNICAL
Writes the Antimatter15 .splat format — fixed-size 32 bytes per Gaussian (position as 3× Float32, scale as 3× Float32, rotation as 4× Uint8 normalized quaternion, RGB+opacity as 4× Uint8). No SH coefficients higher than DC. Smallest file with direct browser compatibility. For gsplat.js and antimatter15's online demo viewer.
M30Export > 3D Formats > Export SOG…
WHERE
Menu bar → Export → 3D Formats → SOG.
TECHNICAL
Writes the Gaussian cloud in the SOG format. SOG ("Self-Organizing Gaussian") is the PlayCanvas format with texture-atlas layout and WebP compression of the quantized data. Scales with 15–20× better size ratio than PLY. The export calls cwebp as an external tool internally — so in the sandbox variant (App Store) potentially restricted.
M31Export > Media > Export Orbit Video…
WHERE
Menu bar → Export → Media → Orbit Video.
TECHNICAL
Renders a 360° orbit around the scene center and encodes it as MP4 (H.264) or MOV (HEVC, depending on system default). Unlike M18 (live recording), the path here is fixed — duration is chosen in the settings or in the Simple Mode export step.
M32Export > Media > Export Web Viewer…
WHERE
Menu bar → Export → Media → Web Viewer.
TECHNICAL
Packages a standalone HTML viewer (gsplat.js-based) plus the Gaussian data Base64-encoded into a single .html file. This file runs offline in any modern browser — no server dependencies, no external URLs. File size is about a factor of 1.3 larger than the SPZ variant (because of Base64 overhead).
M33Export > Photogrammetry > Export SfM (transforms.json)…
WHERE
Menu bar → Export → Photogrammetry → Export SfM (transforms.json).
TECHNICAL
Dedicated export path (not via the common helper routine), because no Gaussian cloud but the SfM result is being exported. Opens a save dialog with transforms.json as the default and content type json. On OK a nerfstudio-compatible transforms.json with camera intrinsics, poses (as a 4×4 matrix in NeRF convention) and frame paths is written. Help text in the UI points out that the training images must be copied alongside as a sibling folder images/. Active only if an SfM result exists and the full version is unlocked.
M34Export > Photogrammetry > Export SfM (COLMAP Workspace)…
WHERE
Menu bar → Export → Photogrammetry → Export SfM (COLMAP Workspace).
TECHNICAL
Opens a save dialog with default name colmap-workspace (without extension, because it's a folder). Writes a standard COLMAP workspace with sparse/0/cameras.bin, images.bin, points3D.bin. Lets you open an SfM reconstruction computed or imported in RadianceKit in other tools like Postshot, Nerfstudio, or Meshroom, or for an A/B re-run reload it as already-computed input in RadianceKit itself (via M5) — saves compute time. Active only if an SfM result exists and the full version is unlocked.
Help Menu
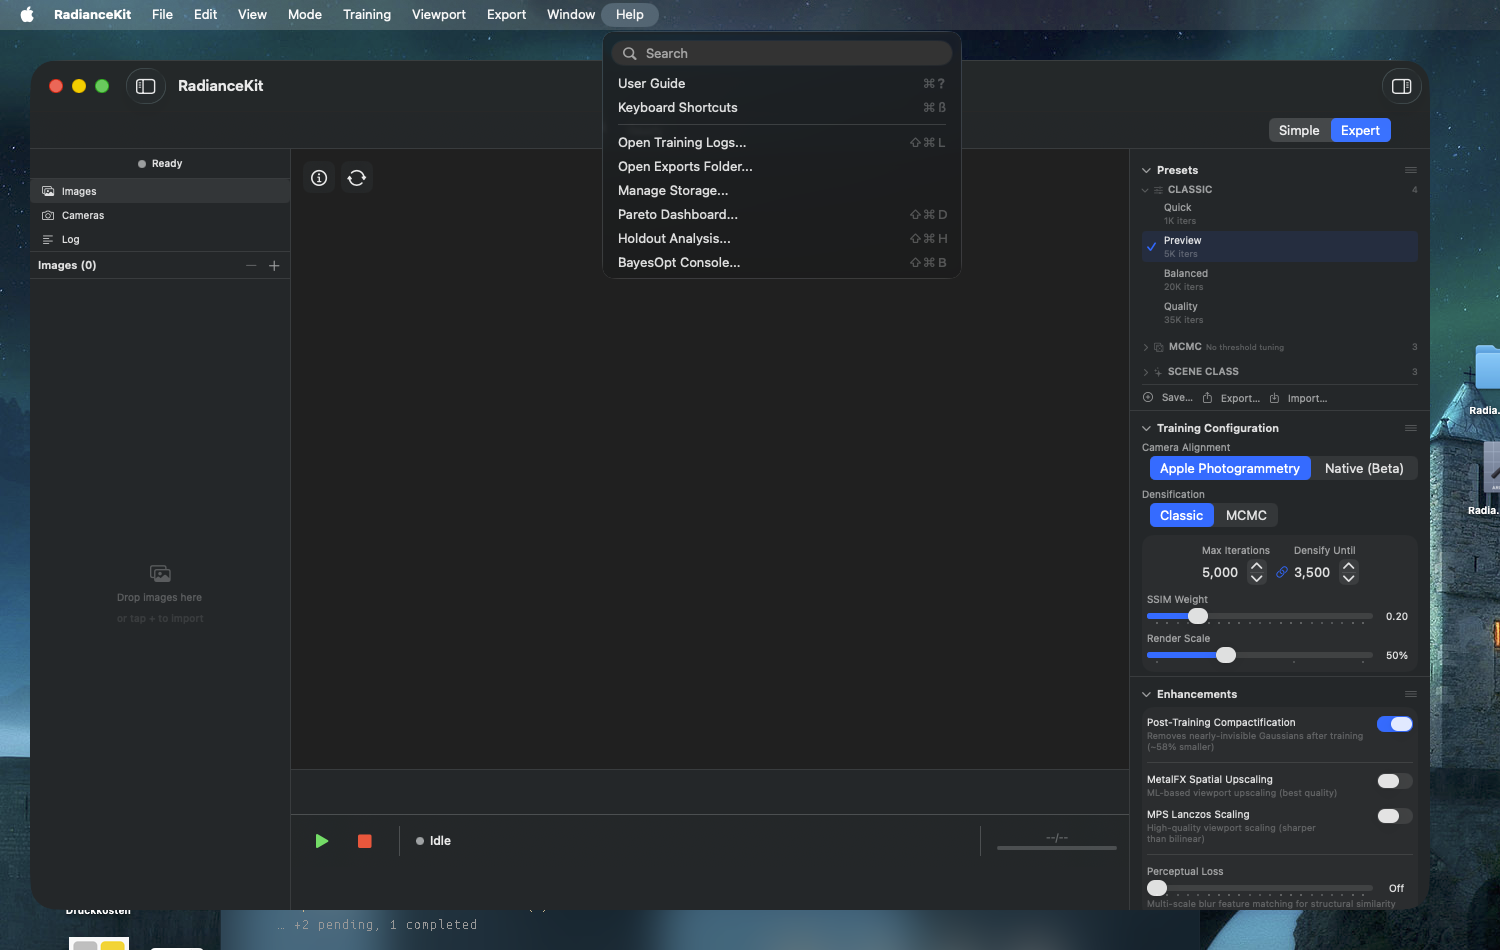
Seven entries: two documentation windows (User Guide, Keyboard Shortcuts), three folder shortcuts (Training Logs, Exports, Storage), and three analysis windows (Pareto Dashboard, Holdout Analysis, BayesOpt Console). Apple-style, the Help menu appears all the way right. The standard Help menu is completely replaced by RadianceKit's own variant.
M35Help > User Guide
WHERE
Menu bar → Help → User Guide (⌘?).
TECHNICAL
Opens the User Guide window. It shows navigation with a topic sidebar and a scrollable detail area at default size 860×640. The contents are statically stored (not parsed from Markdown).
M36Help > Keyboard Shortcuts
WHERE
Menu bar → Help → Keyboard Shortcuts (⌘/).
TECHNICAL
Opens the Keyboard Shortcuts window — a simple scroll layout with all app shortcuts, grouped by top-level menu. Default size 440×560. Contents are likewise statically stored.
M37Help > Open Training Logs…
WHERE
Menu bar → Help → Open Training Logs… (⇧⌘L).
TECHNICAL
Computes the log folder as ~/Documents/RadianceKit/Logs, creates it if necessary, and opens it in Finder. Each training run writes its own JSONL file training_YYYY-MM-DD_HHmmss.jsonl there.
M38Help > Open Exports Folder…
WHERE
Menu bar → Help → Open Exports Folder…
TECHNICAL
Analogous to M37 but with ~/Documents/RadianceKit/Exports. Created on the first auto-test run or on the first click; after that the default paths of all auto-test exports (e.g., autotest_<timestamp>.ply) land there. Exports selected manually via the save dialog do NOT necessarily go here but wherever the user saves them — so this folder is mainly of interest for auto tests.
M39Help > Manage Storage…
WHERE
Menu bar → Help → Manage Storage…
TECHNICAL
Opens the storage browser (see Chapter 4 Auxiliary Windows, IDs W7–W12). Lists all persisted scenes, training logs, exports, and caches in the ~/Documents/RadianceKit/ folder with size, allows reveal in Finder and move to trash per entry.
M40Help > Pareto Dashboard…
WHERE
Menu bar → Help → Pareto Dashboard… (⇧⌘D).
TECHNICAL
Opens the Pareto Dashboard (see Chapter 4, IDs W13–W22). The dashboard loads all JSONL training logs from ~/Documents/RadianceKit/Logs/, organizes them by scene and preset, and draws a Pareto scatter plot (default: loss vs Gaussians, optionally loss vs wallclock or PSNR vs iterations).
M41Help > Holdout Analysis…
WHERE
Menu bar → Help → Holdout Analysis… (⇧⌘H).
TECHNICAL
Opens the Holdout Analysis window (see Chapter 4, IDs W23–W29). Loads a transforms.json, draws the cameras as a 3D globe, and allows train/test fold splits (angular or linear, 2–8 folds). Output is a fold-assignment.json that training can use as the test set in the respective training configs.
M42Help > BayesOpt Console…
WHERE
Menu bar → Help → BayesOpt Console… (⇧⌘B).
TECHNICAL
Opens the BayesOpt Console (see Chapter 4, IDs W30–W39). Loads predefined search spaces (e.g., "MCMC scale-reg + opacity-reg + ssim"), runs Bayesian-optimization trials asynchronously, and shows the convergence curve and trial log live.
Note: Cmd-Z in the Edit Menu
Since May 2026, the Project Navigator in Expert Mode supports deleting imported images via the minus button or Backspace key, and undoing via Cmd-Z. This Cmd-Z action appears in the macOS Edit menu (provided by SwiftUI) as "Undo Remove Image" as long as a deleted image is still recoverable. It is registered via the standard-conformant system, not in ; therefore there is no dedicated M-ID entry in the inventory.
Keyboard Shortcuts Overview
| Menu entry | Shortcut |
|---|---|
| File > Open Scene… | ⌘O |
| File > Save Scene… | ⌘S |
| File > Import COLMAP / Metashape Workspace… | ⇧⌘I |
| File > New Project | ⇧⌘N |
| Mode > Simple Mode | ⌘1 |
| Mode > Expert Mode | ⌘2 |
| Training > Start Training | ⇧⌘T |
| Viewport > Enter/Exit Edit Mode | ⇧⌘E |
| Viewport > Toggle Auto-Rotation | ⌘⌥T |
| Viewport > Save Screenshot | ⇧⌘S |
| Export > 3D Formats > PLY | ⌘E |
| Help > User Guide | ⌘? |
| Help > Keyboard Shortcuts | ⌘/ |
| Help > Open Training Logs… | ⇧⌘L |
| Help > Pareto Dashboard… | ⇧⌘D |
| Help > Holdout Analysis… | ⇧⌘H |
| Help > BayesOpt Console… | ⇧⌘B |
Edit menu (system-provided, in Expert Mode with active Project Navigator selection):
| Action | Shortcut |
|---|---|
| Undo Remove Image | ⌘Z |
| Remove Selected Image | Backspace / Delete |