Chapter 2 — Inspector (Expert View)
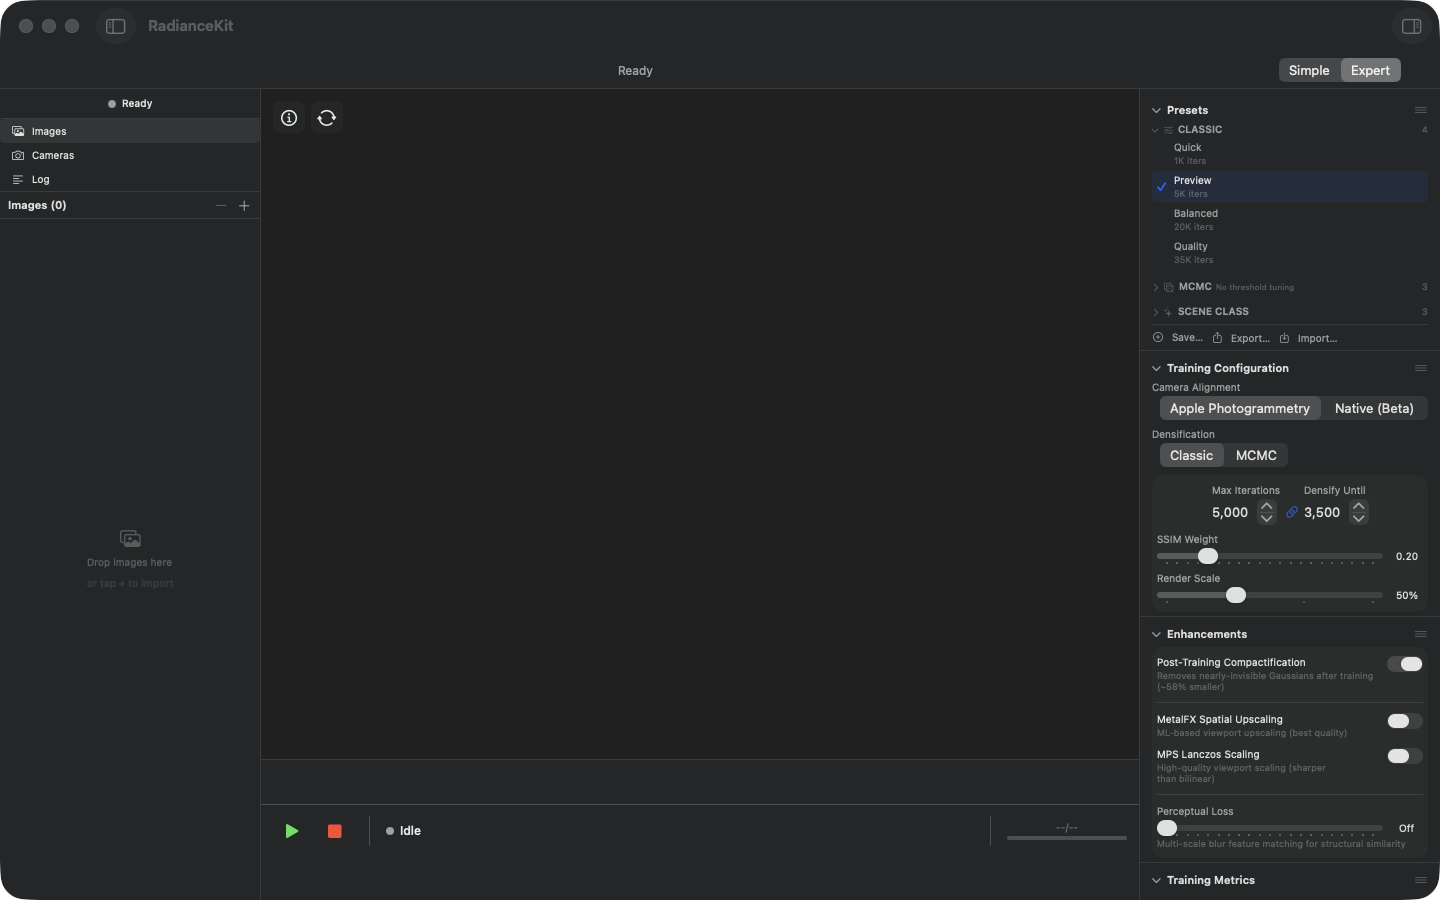
Empty Inspector before import: The left column shows the entries Images, Cameras and Log, below them the header „Images (0)" and the drop zone „Drop images here / or tap + to import". The viewport in the middle is empty. On the right is the Inspector with six collapsed sections: Presets, Cameras & Capture, Training, Progress, Look and Export. Below each heading a grey line states what the section does and when it takes effect — „Ready-made recipes — they replace the training settings" (Presets), „Before training · decides how camera positions are solved · applies to the next run" (Cameras & Capture), „Before training · drives scene build-up and optimization · applies to the next run" (Training), „Display only" (Progress), „After training · applies immediately · reversible any time" (Look) and „Leveling the floor turns the view at once; the chosen orientation and format apply when saving" (Export). At the very bottom the status line runs with the status „Idle" as well as the green start and the red stop button; at the top right is the Simple/Expert toggle, here set to Expert.
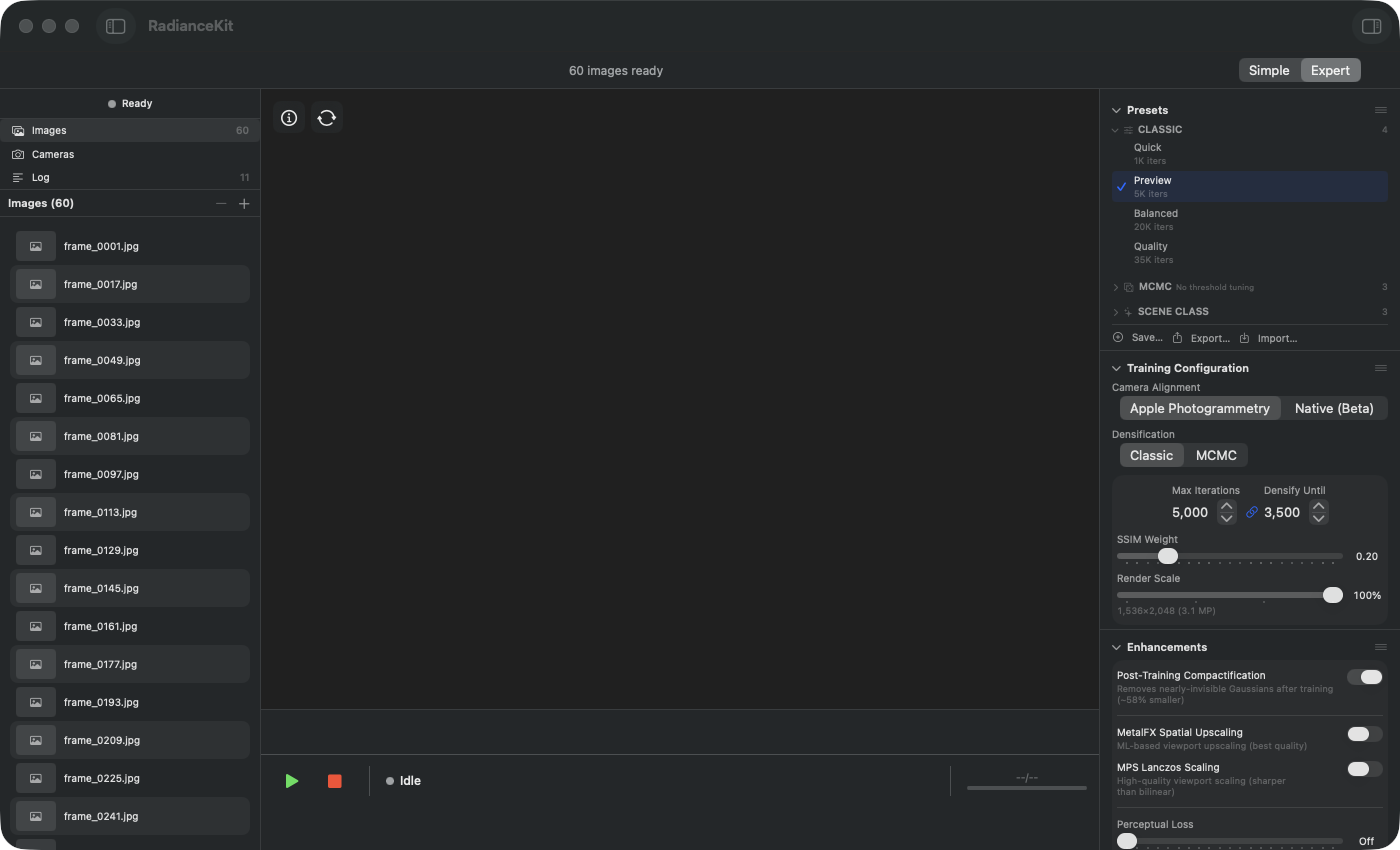
Inspector after import: The header of the image list shows „Images (35)", below it are the imported shots with ascending file names starting at IMG_0953.JPG. The images in this test series are 4032×3024 pixels; the Auto Render Scale logic reads this resolution and suggests a matching Render Scale. The viewport is still empty, the status line reads „Idle". The green start button at the bottom left is now active and starts training with the active preset.
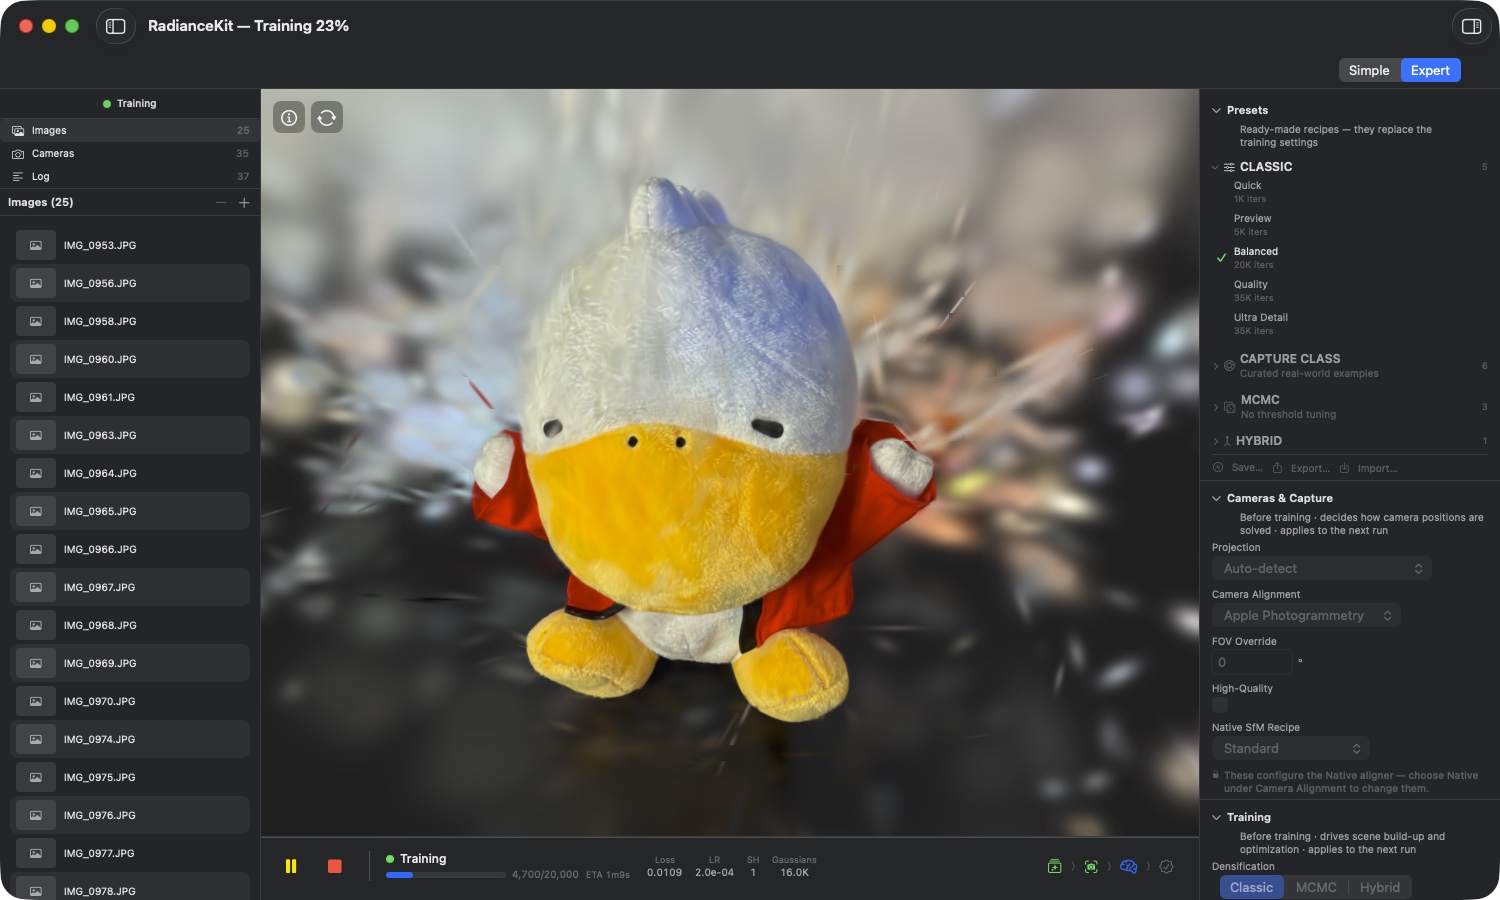
Inspector during training: The title bar shows the overall progress, here „RadianceKit — Training 23%". The viewport renders the ongoing reconstruction in real time — a fabric duck on a sheepskin, already clearly recognisable (the update interval of the live preview is set in Settings → General → Training → Live Preview). Below the viewport run the progress ("4,700/20,000", "ETA 1m9s") and the metric bar with Loss 0.0109, LR 2.0e-04, SH 1 and Gaussians 16.0K; the pause and stop buttons sit at the bottom left. In the Inspector the group CLASSIC is expanded, „Balanced 20K iters" carries the green checkmark. A "Modified" badge only appears once a parameter deviates from the preset — none is visible here. The "Log" sidebar collects SfM and training stage events.
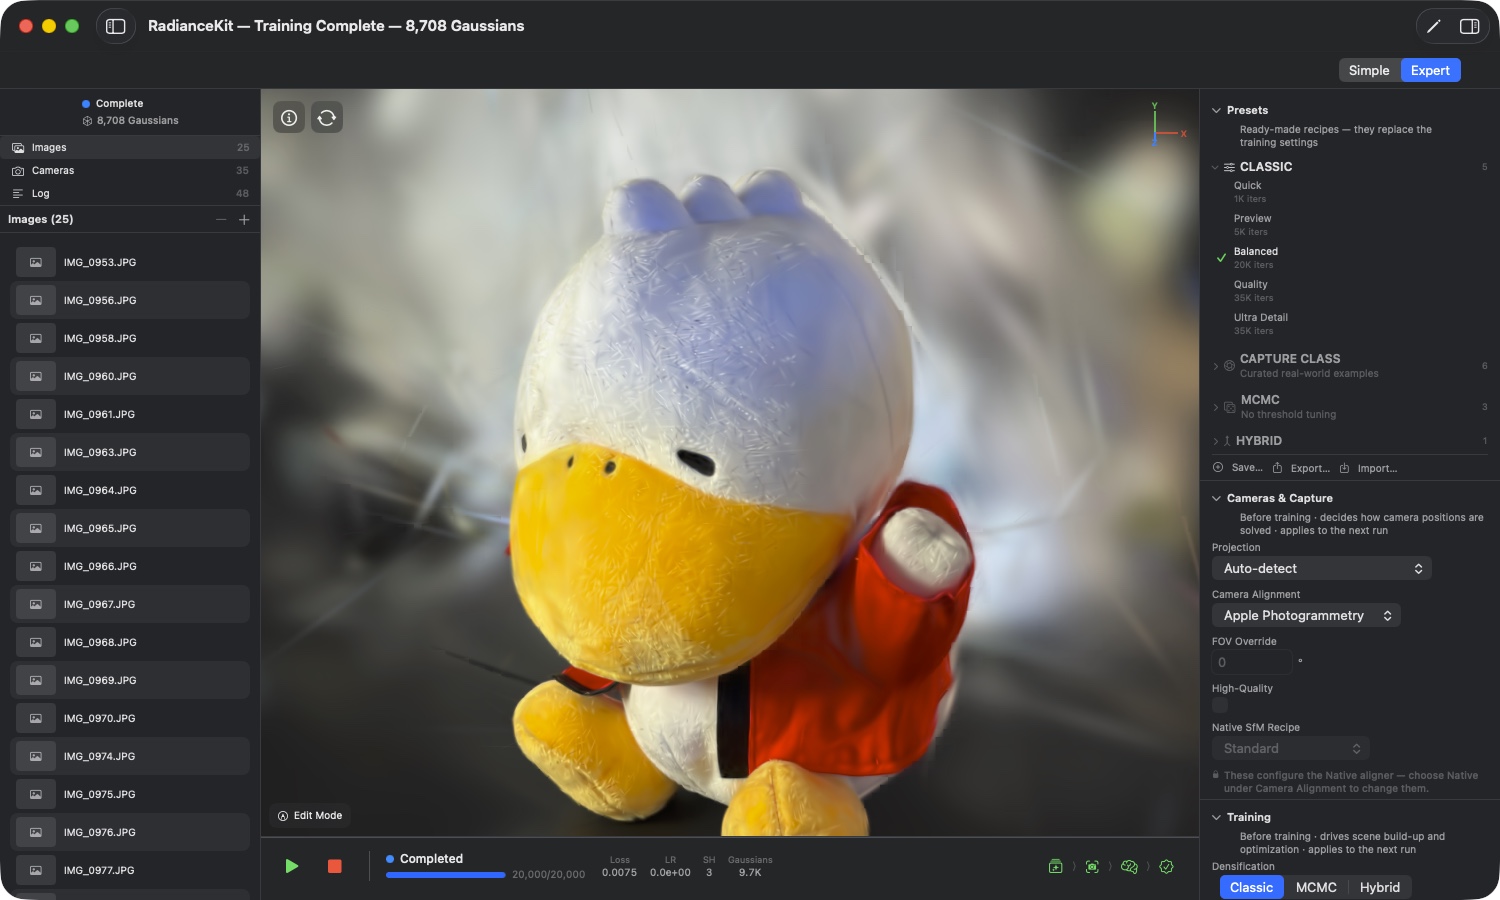
Inspector after training: The title bar states the result: „Training Complete — 8,708 Gaussians". The left column shows „Complete" with the same number, plus Images 25 and Cameras 35 — 25 images because the Frame Quality dialog sorted out ten blurry ones out of 35 shots. The status line reports „Completed" at 20,000/20,000, the metric bar Loss 0.0075, LR 0.0e+00, SH 3 and Gaussians 9.7K. The viewport shows the finished point cloud filling the frame — orbital drag navigation active (rotates around the scene center).
That two different Gaussian counts appear here is intentional: The metric bar and Training Metrics state the level at the end of training (here 9,660, rounded 9.7K), the title bar and scene the level after the automatic cleanup passes (8,708). In between lie Post-Training Compactification and the removal of needle- and disk-shaped splats. The smaller number is the one shown in the viewport and the one that is preserved on export. The groups Training Metrics and Loss History are now filled with the final values, the Export section is active.
The Inspector is the right-hand sidebar in Expert Mode (⌘2). It bundles all training-relevant parameters into six collapsible sections, which have been grouped by domain since 2026-07-18. The default order from top to bottom is: Presets, Cameras & Capture, Training, Progress, Look and Export. Below each heading is a second line naming the phase — when the section takes effect and how reversible it is (e.g. „Before training · decides how camera positions are solved · applies to the next run" for Cameras & Capture, „After training · applies immediately · reversible any time" for Look, „Display only" for Progress). Two former sections have merged: Metrics and Loss Graph are now two separately collapsible groups ("Training Metrics" and "Loss History") within Progress, and the former Enhancements section is now entirely contained within Training. The "Look" section (post-training image adjustments) is the actual UI renaming of the former "Finishing" section — its internal name remains "Finishing" for compatibility reasons, the displayed heading is called "Look" (the same pattern applies to Training, which is internally called "Training Configuration"). Each section can be collapsed by clicking its header, and the order can be rearranged via drag-and-drop. On first launch the sections are collapsed — in the image above all six are closed; the app state then saves collapse and order preferences across app launches. An already saved old arrangement is migrated once to the new grouping on first launch; Viewport ▸ Reset Inspector Layout restores the factory state.
A number of controls from the Inspector appear in almost identical form in Settings (Chapter 3) as well — typically the SfM backend, Sky Masking and similar defaults. The separation is deliberate: Settings provide the app-wide template for newly created projects, while the Inspector overrides these values for the currently open project. Once you know the operating logic of one side, you can use the other blindly.
The left column in Expert Mode — the Project Navigator — does not belong to the Inspector but is its direct neighbour. There, imported images can be selected by clicking, viewed in Quick Look with the space bar, and deleted via the minus button or the Delete key (with Cmd-Z to undo). The Inspector follows the current sidebar selection with context-specific detail information, but the seven main sections always remain available.
Look Section (L1–L5)
The Look section (internally still called "Finishing") has been the fifth Inspector section since the domain regrouping — between Progress and Export — and gathers all post-training image adjustments in one place. All controls work non-destructively: Every slider re-applies the look calculation to an unchanged pristine snapshot (original DC color, opacity, scale) — the adjustment is thus idempotent, not cumulative. The result appears live in the viewport (WYSIWYG, exactly as in the later export) and is baked into every export. The section only becomes available after a training run completes (before that it shows "Available after a training run completes."); its values are reset with every new training run. While an export is running, all controls are locked — a lock hint "Locked while exporting — the file uses the current settings." appears and the GroupBox is disabled.
L1Saturation slider
WHERE
Inspector → Look section → GroupBox → Saturation.
TECHNICAL
Slider 0.5–1.2, displayed to two decimal places (e.g. "1.00"). Scales the SH DC chroma of each splat around the luminance value: 1.0 = unchanged, < 1.0 = desaturated (color pulled toward grayscale), > 1.0 = more vivid. Mathematically, the DC color is recomputed from the pristine snapshot each time, so repeated dragging does not accumulate. Has been validated on DJI drone footage (Pensford Viaduct), which tends to be oversaturated — the drone default is 0.82. Only affects the color base (SH degree 0); higher SH coefficients remain untouched.
L2Splat length slider
WHERE
Inspector → Look section → GroupBox → Splat length.
TECHNICAL
Slider 0.3–1.0, displayed to two decimal places. Pulls the three scale axes of each Gaussian toward their mean in log space (the smaller the value, the stronger the effect): 1.0 = unchanged, smaller values make elongated "needle" splats rounder, 0 would be pure spheres. Targets needle-like, overstretched splats without changing overall size, thereby reducing typical "confetti" artifacts. Applied from the pristine snapshot (original log scale), and therefore idempotent. Commutes with Splat size (L3), because both operate in log space.
L3Splat size slider
WHERE
Inspector → Look section → GroupBox → Splat size.
TECHNICAL
Slider 0.5–2.0, displayed to two decimal places. Scales each Gaussian uniformly on all three axes: 1.0 = unchanged, < 1.0 = smaller/denser/sharper, > 1.0 = larger/"fluffier" (fills gaps between splats). Since the scales live in log space, the multiplication becomes an additive shift there — this commutes with Splat length (L2), because a constant offset leaves the deviation from the mean untouched. Applied from the pristine snapshot, and therefore idempotent. New in this version.
L4Fade far region (with sub-sliders)
WHERE
Inspector → Look section → GroupBox → "Fade far region" toggle plus the sub-sliders "Fade start ×radius" and "Fade floor".
TECHNICAL
A toggle that activates a radial opacity falloff with distance from the camera centroid — the weakly observed "far confetti" in the background is faded out. Orbit captures only: The toggle is grayed out if the scene doesn't qualify (linear flights, too few or degenerate cameras); in that case, instead of the sub-sliders, a hint appears: "Far-fade applies only to orbit captures (not this scene)." Suitability is determined via the azimuthal coverage of the camera positions (an orbit circles the centroid and fills many compass sectors, a linear flight only ~2). Two sub-sliders control the geometry: Fade start ×radius (1.0–3.0) sets the inner radius as a multiple of the orbit radius, within which full opacity applies; Fade floor (0.0–1.0) is the opacity factor far beyond the fade radius. Important: The fade skips the sky dome region (the frozen Gaussians of the dome), so the intentional background dome isn't dimmed along with it.
L5Reset finishing button
WHERE
Inspector → Look section → GroupBox → "Reset finishing" (below, small button).
TECHNICAL
Resets all look settings to their defaults (Saturation 1.0, Fade off, Splat length 1.0, Splat size 1.0) and immediately triggers a re-finishing pass, so the viewport jumps back to the unchanged trained state. Since the entire look stack computes idempotently from the pristine snapshot, "back to default" is exactly the original training output — no quality loss from repeated back-and-forth adjustments. Like all controls in the section, it is locked during a running export.
Presets Section (I1–I11)
The Presets section is the fastest way to apply a tested configuration. Built-in presets (Capture Class, Classic, MCMC, Hybrid) provide proven, reproducible starting points; you can save, export, import, and share your own presets. The list is grouped by category (Capture Class, Classic, MCMC, Hybrid, Custom), and more than one category can be expanded at the same time. The context menu mechanism (right-click on a row) provides access to export, duplicate, and — for custom presets — delete.
I1Save… Button
WHERE
Inspector → Presets section → Save… button (action bar at the bottom).
TECHNICAL
Opens a popover with a text field and Save/Cancel buttons. The current state of the training settings is persisted as a new custom preset (JSON-encoded, stored app-wide). The save operation copies all 81 training parameters plus the current densification strategy. The preset automatically lands in the Custom category, regardless of which built-in preset it was derived from. Empty names and whitespace-only input are discarded. Already existing names are not rejected — every preset has its own internal ID, duplicate names are technically allowed, but practically confusing.
I2Preset Name TextField
WHERE
Save popover → "Preset Name" text field.
TECHNICAL
Simple text field with rounded border, wide shape. The value is adopted as the preset name when clicking the Save button. No length limit in the UI, but the saved name must be JSON-encodable and displayable in the UI lists — emoji and umlauts work. The content is automatically reset to an empty string when the popover is opened. The Save button remains disabled as long as the field is empty after trimming. There is no auto-suggest and no pre-filling with the name of the currently active preset.
I3Cancel Button (Save Dialog)
WHERE
Save popover → Cancel button (left).
TECHNICAL
Closes the popover without saving. Discards the text field content — the next time it's opened, it will again be reset to empty by the Save… button logic (I1). Standard button style, no confirmation dialogs, no hotkeys. The current TrainingConfig remains unchanged, since the save path was never executed.
I4Save Button (Save Dialog)
WHERE
Save popover → Save button (right, prominent style).
TECHNICAL
Triggers the actual persistence. Validates once more that the name is non-empty (defensive check) and then writes the current TrainingConfig as JSON into app storage. Then closes the popover. Highlighted in blue, grayed out as long as the text field is empty. If saving fails (e.g. because the app storage is full — very unlikely), there is currently no visible error dialog; the preset would then simply not appear on the next app launch.
I5Export… Button
WHERE
Inspector → Presets section → action bar → Export… button.
TECHNICAL
Exports the currently selected preset as a .radiancepreset file (internally JSON). Disabled if no preset is selected. When clicked, the app opens a Save dialog with a default filename (preset name + .radiancepreset extension). The saved format contains the complete TrainingConfig plus metadata (name, category, ID, built-in flag). Double-clicking in Finder opens the app — but not the import automatically; the user must use the Import button (I6).
I6Import… Button
WHERE
Inspector → Presets section → action bar → Import… button.
TECHNICAL
Opens a file dialog that only accepts .radiancepreset files (multi-selection disabled). When selected, the JSON file is loaded, validated, and inserted into the Custom category — with a new internal ID, so that no collisions with built-ins occur. The import automatically sets the category to Custom, even if the exported preset was originally, e.g., a built-in. Corrupted files or files incompatible with an older schema version are silently rejected, without a error dialog (but the console log provides information).
I7Preset Row (Click Activation)
WHERE
Inspector → Presets section → every preset row in every category.
TECHNICAL
Clicking a preset row replaces all fields of the TrainingConfig with the values from the preset, remembers the ID of the active preset, and resets the Modified status. The active checkmark in front of the row only appears if the preset is selected AND unmodified. As soon as a value in the TrainingConfig is changed (slider, stepper, toggle in the other Inspector sections), an orange "Modified" badge appears after the name. Built-in presets cannot be overwritten — if modified, a separate copy must be created via the Save button (I1).
I8Context Menu "Export…"
WHERE
Right-click on any preset row → first entry "Export…".
TECHNICAL
Identical functionality to I5 (Export… button), but more conveniently accessible — without the preset needing to be selected beforehand. Directly exports the preset clicked in the row. Works the same for all preset categories (built-in or custom), no restriction. The export contains the built-in flag and the original category, but on re-import the category is mapped to Custom as described under I6.
I9Context Menu "Duplicate"
WHERE
Right-click on any preset row → second entry "Duplicate".
TECHNICAL
Clones the preset into the Custom category. Creates a new internal ID, appends " Copy" to the name, and saves the copy. Also works for built-in presets — the clone is then editable. The original remains untouched. The TrainingConfig is copied value-for-value (JSON round-trip), so there are no reference bindings between the original and the copy.
I10Context Menu "Delete"
WHERE
Right-click on your own preset rows → last entry "Delete" (red, destructive).
TECHNICAL
Only visible for custom presets. Built-ins cannot be deleted. The entry is marked as destructive, appears red in the context menu, and is set off behind a divider so that it isn't clicked by accident. There is no confirmation dialog — one click deletes the preset immediately. The deleted preset cannot be restored (Cmd-Z doesn't work here — undo in the current build only exists for the image list, not for preset operations). If the deleted preset was currently active, the current TrainingConfig remains unchanged, only the active preset selection is cleared.
I11Category Header (Expand/Collapse)
WHERE
Inspector → Presets section → every category header (Capture Class, Classic, MCMC, Hybrid, Custom).
TECHNICAL
Collapse state per category with different defaults: the curated Capture Class group starts expanded, Classic, MCMC, Hybrid, and Custom start collapsed. The state is not persisted — on app restart, all categories are back in the default state. The chevron arrow rotates with animation. The number on the right in the header shows the number of presets in this category. The click hit area covers the entire header region.
Training Configuration Section (I12–I22)
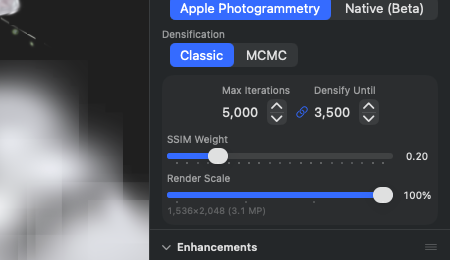
This is where the central levers for the training run live: how Densification works, how many iterations, how strongly SSIM is weighted — plus, at the bottom, the formerly standalone enhancements (Perceptual Loss, Outdoor group, Advanced Densifier, Post-Training passes). At the very top sits Densification as a three-way switch Classic | MCMC | Hybrid. The SfM backend is no longer here, but in its own section Cameras & Capture (I12, I13). The three MCMC rows ("MCMC Quality", "Auto-scale by scene" and "Max Gaussians") no longer disappear in Classic mode — they stay visible and get grayed out; below them sits a row with a lock icon that explains what needs to change ("Only used by the MCMC and Hybrid densifiers — switch Densification above to change these."). A set-apart block below that summarizes the rows that apply to every densifier: Depth-Priority Scatter, Full-Resolution Training, the coupled pair Max Iterations / Densify Until, and the sliders SSIM Weight and Render Scale.
I12Camera Alignment Picker
WHERE
Inspector → Cameras & Capture → Camera Alignment (pop-up menu below the Projection picker).
TECHNICAL
Pop-up menu, not a segmented picker — the labels are too wide for the narrow Inspector column. Which entries appear depends on the build: the sandboxed App Store version offers Apple Photogrammetry and Native, dev/DMG builds additionally offer COLMAP. Reason: COLMAP is an external command-line program, and sandboxed apps aren't allowed to launch foreign binaries (App Review Guideline 2.5.2) — which is why the backend entry, along with the mapper picker and binary path, is entirely missing in the Store build rather than being permanently grayed out: a row that can never light up isn't a hint, it's noise. Not to be confused with: Importing and exporting a COLMAP workspace is plain Swift file parsing, needs no COLMAP installation, and works in every build (Chapter 1, M5). The "(Beta)" suffix on the Native entry is gone — Native hasn't been beta since v1.5.2. The selection determines the SfM backend for the next run and simultaneously controls which rows below become operable (I13, High-Quality, Native SfM Recipe). Footnote in the UI: For an unsorted photo set, the pipeline always aligns with Native, no matter what the picker shows — this recipe exists only there. The picker is deliberately not locked in that case (the value isn't unavailable, it's just overridden); instead a hint with a branch icon appears.
I13FOV Override field (Native SfM)
WHERE
Inspector → Cameras & Capture → FOV Override (always visible, operable only when Camera Alignment = Native).
TECHNICAL
Numeric text field (range 0-170°), default 0 = automatic determination from EXIF or heuristics. Manual entry is required if the input images were extracted from a video that contains no focal-length metadata. Typical values: iPhone Wide ≈ 73°, DJI Mavic Wide-Crop ≈ 70°, drone with full-frame sensor ≈ 84°. The value is clamped to [0, 170] — values outside that range are pushed straight back. Only affects the native SfM pipeline (Q4/Q5); Apple Photogrammetry ignores this value entirely. Since 2026-07-18: under other backends the field is no longer hidden, but grayed out — together with "High-Quality" and "Native SfM Recipe" and a row with a lock icon ("These configure the Native aligner — choose Native under Camera Alignment to change them."). The previous hiding behavior concealed the fact that these controls exist at all. The gate is tied to the selected backend, not the one actually used — the redirection of unsorted photo sets to Native is instead reported by the hint under I12. The "Native SfM Recipe" row additionally requires an unsorted photo set and otherwise carries its own explanatory row.
I15Densification picker
WHERE
Inspector → Training Configuration → Densification (segmented picker, always visible).
TECHNICAL
Switches between the two Densification strategies: Classic (original 3DGS method with Clone/Split/Prune and gradient threshold) and MCMC (Stochastic Gradient Langevin Dynamics with Relocation, NeurIPS 2024). When switching from Classic to MCMC, the app automatically sets the MCMC-specific fields to proven default values (reg weights = 0, MCMC cap multiplier 3.0, sample/noise schedule). Without this automatic initialization, sessions with old presets suffered from the 1.4.4 MCMC collapse bug (460K→5 Gaussians, watchdog kill). The picker selection additionally determines which Inspector elements are visible — with MCMC, I16/I17 appear. Detailed field effects are in Chapter 6, T11–T16 (Classic) and T61–T73 (MCMC).
I16MCMC Quality toggle
WHERE
Inspector → Training → MCMC Quality (always visible, operable when Densification = MCMC or Hybrid).
TECHNICAL
Switches gradient accumulation to 2 steps (active) or 1 step (inactive). Accumulates gradients from two consecutive camera views before the optimizer step is executed. This smooths the optimization path and improves the final result slightly but noticeably. The price: doubled training time. For very long trainings (200K iterations), this adds an extra 10+ minutes of waiting time — so it's only worthwhile when the last few percent of quality are actually needed. Only affects training, not the export format or the Viewport display. Also applies to Hybrid, which uses the same MCMC machinery. Since 2026-07-18: under Classic the row no longer disappears, but is grayed out together with I17 and "Max Gaussians"; below it reads "Only used by the MCMC and Hybrid densifiers — switch Densification above to change these."
I17Auto-scale by scene toggle
WHERE
Inspector → Training → Auto-scale by scene (always visible, operable when Densification = MCMC or Hybrid).
TECHNICAL
When active, scales the effective Max Gaussians ceiling with SfM init point count × MCMC cap multiplier (default 3.0). Example: SfM yields 250K init points, base cap = 150K, multiplier 3.0 → effective ceiling = max(150K, 750K) = 750K. When disabled, only the base strictly applies. The base itself is set in the Max Gaussians row directly below (since 1.8, default 150,000, input clamped to 10,000–30,000,000). If the effective ceiling exceeds the base, the app displays it as plain text ("Effective cap for this scene: …") — along with a RAM warning if it gets too high. Introduced for v1.4.5 because large outdoor captures with over 1000 frames and correspondingly high SfM point density starved densification under the rigid 150K cap default — superfluous points remained, new ones couldn't form. Default OFF in custom presets, ON in MCMC built-ins. Only affects training time, not export. Since 2026-07-18: under Classic, the row is grayed out instead of hidden (with the same explanatory row as I16); the plain-text display and RAM warning deliberately don't appear there, because Classic doesn't apply a ceiling at all.
I18Max Iterations stepper
WHERE
Inspector → Training Configuration → GroupBox → Max Iterations.
TECHNICAL
Stepper with range 1,000–100,000, step size 1,000. Determines the total number of optimizer iterations. Linearly correlated with training time (halving = about 50% time). Proven values are 20K (Classic Balanced), 40K (Classic Quality) and 200K (MCMC Full). Beyond 40K, Classic barely improves further — the returns flatten out. When changing this, if the link function (I19) is active, Densify Until is pulled along proportionally (default ratio: 0.5, i.e. Densify Until = Max/2).
I19Link/unlink button (Densify ↔ Iterations)
WHERE
Inspector → Training Configuration → GroupBox → small link button between Max Iterations and Densify Until.
TECHNICAL
Toggle button that freezes the ratio of Densify Until to Max Iterations. When active (link icon highlighted), every change to Max Iterations pulls Densify Until along proportionally. When unlinked (link-plus icon), the values remain independent. Default is linked, because that reflects the typical correlation — if you pull the training to double the iterations, you usually also want densification to run proportionally longer. The ratio is calculated from the current value when the link button is set; a typical ratio is 0.5 (Densify Until = half the iteration count).
I20Densify Until stepper
WHERE
Inspector → Training Configuration → GroupBox → Densify Until.
TECHNICAL
Stepper with range 500–50,000, step size 500. Determines the iteration index from which no new Gaussians are added via Clone/Split (Classic) or Relocation (MCMC). After that point, only position and color are refined. Higher values = more Gaussians = larger file, longer per-iteration time (+30-60% GPU time per step). Typical values: 15K (for 30K max iter), 20K (for 40K), 100K (for 200K MCMC). Automatically scaled when link (I19) is active. Behaves differently for Classic vs MCMC: Classic stops growth entirely, MCMC stops the relocation logic, but sample/noise adaptation keeps running.
I21SSIM Weight slider
WHERE
Inspector → Training Configuration → GroupBox → SSIM Weight.
TECHNICAL
Slider 0.0–1.0 in 0.05 steps, displayed as "0.20". Blends L1 loss (0.0) and SSIM loss (1.0). L1 tightens brightness per pixel, SSIM tightens structural similarity (edges, local statistics). Default 0.2 is the value from the original 3DGS paper (Kerbl 2023) and a robust compromise for nearly any scene. Higher values (0.5+) favor detail preservation, but can ignore local brightness errors. Lower values (< 0.1) lead to detail loss at sharp edges. The SSIM computation runs in the shader with an 11×11 Gaussian window. Performance: at 0.0 (L1 only), training is about 8-12% faster, because the SSIM computation in the shader is skipped.
I22Render Scale slider
WHERE
Inspector → Training Configuration → GroupBox → Render Scale.
TECHNICAL
Slider 0.25–1.0 in 0.25 steps, displayed as "100%". Scales the training render resolution relative to the source image size. Biggest lever on performance: 50% reduces GPU time by about 75% (because of 4× fewer pixels), 25% by about 94%. The gradient threshold is automatically scaled along with it. Below the slider a live resolution display appears in MP (e.g. "2304×1296 (3.0 MP)"). If the current value deviates from the recommended one, "— recommended: 50%" is shown in orange text. The recommendation targets ~3 MP effective resolution — the range Apple Silicon GPUs process most efficiently. 4K source images, for instance, automatically get 25% recommended, Full HD images 100%. A change additionally triggers buffer reallocation.
Enhancements Groups (in the Training Section, I26–I29, I42–I44)
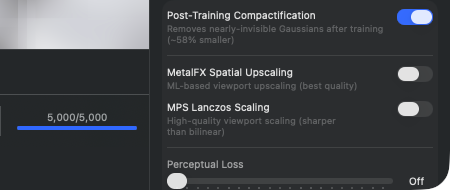
These groups collect features that improve image quality without changing the core training loop itself. Until 2026-07-18 they formed their own Inspector section called Enhancements; since the domain regrouping they now sit at the bottom of the Training section. The former Viewport-Scaling picker (Off/MetalFX/Lanczos) has been removed without replacement: it never had any effect — the blit decision in the viewport is purely geometric — and its label additionally promised upscaling, while the actual Lanczos pass is an antialiasing downscaling of an oversampled image. Accordingly, the display in the viewport is now called „Sampling" instead of „Scaling" (Chapter 4); nowhere in the app is anything upscaled with MetalFX. Despite its group membership, the Perceptual Loss (I29) is a training component — it is activated during training as an additional loss term; it sits at the very top, with the explanatory line „Multi-scale blur feature matching for structural similarity". Below it comes the Outdoor group with four switches — Sky Masking, Person Masking, Floater Cleanup and Reconstruct Sky Dome (I42–I44) —, training options against sky floaters that used to live in the settings window and are now per-project here. Next comes the collapsed row „Advanced Densifier (Expert)", which carries a warning triangle because behind it lie sliders that can also break a training run. The group „Runs automatically at the end of training" closes things out with Post-Training Compactification (I26) and the „Remove Needle/Disc Floaters" switch.
I26Post-Training Compactification toggle
WHERE
Inspector → Training → group „Runs automatically at the end of training" → Post-Training Compactification.
TECHNICAL
Enables a cleanup pass at the end: after the training iterations finish, Gaussians with opacity below 0.01 (1% visibility) are deleted. This typically shrinks the file size by about half without any visible quality loss — because these Gaussians don't contribute visually anyway. The compactification runs as a GPU compact pass and takes anywhere from a fraction of a second to a few seconds depending on the Gaussian count. Doesn't affect training performance. When this toggle is off, invisible Gaussians are also exported — relevant only if you want to use the format for a further training stage (Continue Training); otherwise it's a waste of storage.
I29Perceptual Loss slider
WHERE
Inspector → Training → Perceptual Loss.
TECHNICAL
Slider 0.0–0.2 in 0.01 steps, displayed at 0.0 as „Off", otherwise as „0.05" etc. Enables an additional loss term that compares multi-scale Gaussian blur of the rendering with the ground-truth image (3 blur scales). Captures structural differences that L1+SSIM alone can't detect. Values between 0.05 and 0.1 visibly improve fine structures while only costing a small amount of training time — around 5% (extra forward pass through the blur kernels). Above 0.15 training becomes unstable and quality drops again, because this loss term starts to dominate the optimization. Takes effect during training, not in post-processing — despite its position among the Enhancement rows at the end of the Training section, this is not a pure after-the-fact enhancement.
I42Sky Masking
WHERE
Inspector → Training (Outdoor group) → „Sky Masking" toggle. Saved per project; default: off.
TECHNICAL
Enables pre-training Apple Vision-based sky pixel segmentation. Before training starts, for each input camera the sky region is extracted via the Apple Vision foreground mask (sky = background) and assigned as a per-pixel mask to the respective camera. During training, the per-pixel loss contribution is multiplied by the complement of the sky mask — sky pixels contribute 0 to the gradient, so Gaussians projecting into the sky receive no optimization signal and therefore don't become „denser" or „brighter". Significantly reduces floaters (dark clumps in the sky) in outdoor/drone scenes. Costs ~3% L1 regression in classic 40K training. Only useful for outdoor scenes with a clearly identifiable sky; in indoor scenes or with a white background, the sky segmentation identifies the wrong areas and blocks valid loss signals. The value is saved per project (no longer app-global) and follows the preset or scene file.
I43Floater Cleanup
WHERE
Inspector → Training (Outdoor group) → „Floater Cleanup" toggle (subtitle „Remove Gaussians outside all camera views"). Saved per project; default: off.
TECHNICAL
The switch controls two effects with different conditions; both are derived into the run-local config at start, not written into the saved configuration (otherwise they'd get stuck as a one-way latch). (1) Frustum union cull at the end of training — Gaussians outside the union of all camera frusta are removed („never observed" = „never constrained", and that's exactly what most floaters are). This part has no strategy condition and runs identically under Classic, MCMC, and Hybrid — it's the part the switch is named after. (2) Two additional density-control passes mid-run — only under Classic and only from 30,000 iterations onward, set at 55% and 85% of the run length (so around 20K and 30K for a 35–40K run). Both passes look for Gaussians with very low opacity, tiny screen-space size, and no loss contribution, and purge them. Effect: ~5–15% fewer Gaussians at the end, noticeably fewer dark clumps in the sky in drone/outdoor scenes. Costs ~1–3% L1 regression in close-up indoor scenes, hence not enabled by default. The value is saved per project and follows the preset or scene file. Correction relative to earlier editions: The toggle is no longer limited to the Classic densifier and is no longer grayed out under MCMC/Hybrid — that used to lock out exactly the MCMC and Hybrid users for whom the cull is effective. For short runs (e.g. P2 Preview 5K), only the mid-run part is skipped.
I44Reconstruct Sky Dome
WHERE
Inspector → Training (Outdoor group) → “Reconstruct Sky Dome”. “Sky Output” then appears below it with “Embedded in Splat” and “Separate Skybox”. Saved per project; default: off and, when enabled, embedded in the Splat.
TECHNICAL
RadianceKit detects sky in the input images and projects only those genuinely observed pixels onto a distant sphere using the known cameras. The horizon, buildings, vegetation, and ground remain protected. Embedded in Splat adds the sky as a fixed distant shell to the 3D file; this is the most portable single-file option. Separate Skybox forces sky masking, builds a 2:1 environment map from all cameras, and leaves sky splats out of the 3D exports. The app can automatically close one small, safely bounded hole directly at the zenith. Larger or disconnected holes remain marked as missing: the Skybox package contains the real partial panorama and masks. After an external completion, RadianceKit accepts only pixels that were previously marked as missing sky. The observed horizon and real sky pixels remain unchanged.
Metrics Section (I30–I37)
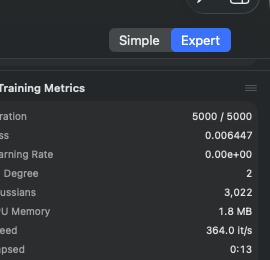
While a training run is in progress, the metrics group ("Training Metrics", one of the two collapsible groups in the Progress section) shows eight live values from the training loop. Before a training run starts, it is empty ("Start training to see live metrics"). All values are updated every ~30 iterations (update frequency of the live metrics). The section is read-only — no element can be clicked or changed. For deeper analysis, consult the JSONL training logs under ~/Documents/RadianceKit/Logs/.
I30Iteration
WHERE
Inspector → Progress → Training Metrics → Iteration. Read-only.
TECHNICAL
Display in the format "4523 / 40000" — current iteration over total planned iterations. Counts in sync with the training loop, which pushes the values every ~30 iterations. The second number corresponds to the Max Iterations value at the time training started; it no longer changes even if the user adjusts the stepper afterward — the running run uses its own snapshot copy. If the app adds more iterations via the Training menu (Continue Training +5K/+10K/+20K), the denominator increases.
I31Loss
WHERE
Inspector → Progress → Training Metrics → Loss. Read-only.
TECHNICAL
Float value with six decimal places (e.g. "0.024385"). Measures the combined L1+SSIM loss (mix controlled via I21 SSIM Weight) plus optionally Perceptual Loss (I29) and other regularizers. The scale is not absolute but scene-dependent — most comparisons require the same dataset. Typical final values for good configurations: - Classic Quality 40K iters: 0.022–0.025 (Horse, Truck, Garden) - MCMC Full 200K iters: 0.024–0.028 - Outdoor drone 30K: 0.030–0.060 (worse due to geometry) - Indoor apartments: 0.018–0.025
Values above 0.10 after 5K iterations suggest SfM problems (poor camera poses) — abort and recompute SfM.
I32Learning Rate
WHERE
Inspector → Progress → Training Metrics → Learning Rate. Read-only.
TECHNICAL
Scientific-notation display (e.g. "1.60e-04"). Current learning rate for the position parameters (3DGS has six independent LRs for position, SH-DC, SH-Rest, opacity, scale, rotation — the position LR is shown here as a representative value). Default starting value 1.6e-4, which decreases via an exponential decay to ~1.6e-6 by the end of training. The decay can be adjusted via the LR schedule field in the training configuration (T field in ch. 6). If the LR remains unusually high (e.g. 1e-3 or more after 10K iterations), this could indicate a misconfigured configuration was loaded.
I33SH Degree
WHERE
Inspector → Progress → Training Metrics → SH Degree. Read-only.
TECHNICAL
Integer 0-3. Spherical harmonics degree for the color representation. Starts at 0 (only the DC component, i.e. direction-independent color per Gaussian — just one RGB constant) and progressively increases to 3 over the course of training. The default schedule raises the degree by 1 at 1000/2000/3000 iterations. SH-3 corresponds to 48 color coefficients per Gaussian (3 RGB channels × 16 SH basis functions). Higher SH degree = more direction-dependent reflection (glossy surfaces correctly look different from different viewing angles), but also more memory and slower training.
I34Gaussians
WHERE
Inspector → Progress → Training Metrics → Gaussians. Read-only.
TECHNICAL
Current number of Gaussians in the model, formatted with a locale separator (e.g. "524,318"). Growth: - Classic: starts at the SfM init points (typically 50K-300K), grows through clone/split up to shortly before Densify Until, then static until the end of training (modulo pruning) - MCMC: sample points are added up to the MCMC cap, then only relocation happens
Healthy final values: - Classic Quality: 400K-700K (Horse 524K, Garden 800K) - MCMC Full: exactly at the cap (default 150K, with Auto-Scale Multiplier × SfM count depending on scene 500K-1.5M)
With MCMC, the number dropping to < 60% of the cap → anomaly (collapse indicator, suggests overly aggressive regularizers).
I35GPU Memory
WHERE
Inspector → Progress → Training Metrics → GPU Memory. Read-only.
TECHNICAL
Estimate of Gaussian buffer memory consumption as Gaussian count × 616 bytes (formatted in memory style). 616 bytes is the size of a fully equipped Gaussian (position, scale, rotation, opacity, SH coefficients degree 3, gradient accumulator). The display does not capture renderer overhead (tile buffer, sort buffer, backward buffer) — the real GPU memory requirement is typically 2-3× above this value. At 500K Gaussians: shown ~290 MB, real ~700 MB. At 1.5M Gaussians: shown ~880 MB, real ~2.5 GB. On M3 Max with 64+ GB unified memory this is uncritical, on M3 Pro with 18 GB it's already a limit.
I36Speed
WHERE
Inspector → Progress → Training Metrics → Speed. Read-only.
TECHNICAL
Iterations per second with one decimal place ("24.3 it/s"). Calculated by the trainer as a moving average over the last ~100 iterations. Typical values: - Quick preset (1K iters): 80-120 it/s (short, no steady state) - Classic 20K @ 1.0 Render Scale (Truck scene, M3 Max): 25-35 it/s - Classic 20K @ 0.5 Render Scale: 80-120 it/s - MCMC 200K @ 0.5 Render Scale: 25-50 it/s (slower due to relocation) - At 1M+ Gaussians and full resolution: < 10 it/s
Decreasing speed over the course of training is normal — more Gaussians = more compute per iteration. Sudden drops (e.g. from 30 → 5 it/s) suggest GPU thermal throttling or competing apps.
I37Elapsed
WHERE
Inspector → Progress → Training Metrics → Elapsed. Read-only.
TECHNICAL
Time elapsed so far as "4:23" (m:ss) or "1:23:45" (h:mm:ss). Format switches at 1 hour. Measures only the pure training time, not the preceding phases (SfM computation, image import). During pause/resume, the clock keeps running — so it's wall-clock time, not CPU time.
Loss Chart Section (I39–I41)
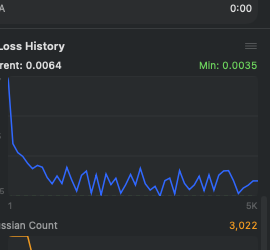
The loss chart group ("Loss History", the second collapsible group in the Progress section) visualizes the training progress over time. It consists of two charts: a loss curve chart (large, on top, blue) and a Gaussian count chart (smaller, below, orange). Both are built live during training and persist until the next training start. Before the first training run, the area is empty ("Loss curve will appear during training"). The charts are pure SwiftUI path drawings (not the Swift Charts framework), so they render smoothly even with 100K+ points.
I39Current Loss (display)
WHERE
Inspector → Progress → Loss History → left label area "Current: 0.0075". Read-only.
TECHNICAL
Float value of the last loss sample point, formatted with four decimal places. Identical to I31 (Loss in the Metrics section), just formatted more compactly here. The source is the loss history — a list that gets an entry roughly every ~30 iterations. Only finite values are included in the list — NaN/Infinity (very rare, in the case of a gradient explosion bug) are filtered out.
I40Min Loss (display)
WHERE
Inspector → Progress → Loss History → right label area "Min: 0.0051" (green). Read-only.
TECHNICAL
Minimum of all loss values ever seen in the current training run. Recomputed live from the loss history — no separate persistence. Displayed in green text because "Min" = "Best so far". The dashed green line at the bottom edge of the chart marks this Y position visually. In continue-training sessions, the minimum tracking restarts — the old history is replaced by the new one in the UI (not appended). If the current training run performs worse than the previous one, the Min display can therefore end up larger than the previous final result.
I41Gaussian Count Chart
WHERE
Inspector → Progress → Loss History → second chart below (orange). Read-only.
TECHNICAL
Line chart of the Gaussian count over the training iterations. Source: the Gaussian count history (list of (iter, count) pairs, filled by the trainer roughly every ~30 iterations). Y-scale dynamic between the minimum and maximum of the history. With the Classic strategy, the curve typically looks like this: steadily rising until Densify Until, then flat (with small pruning fluctuations). With MCMC: steep rise up to the cap, then a horizontal line (relocation keeps the count constant). A decline right at the very end is normal — in the image above, the curve drops from around 16K to 9,660, because the cleanup passes kick in after the last iteration (I26). What's actually alarming is only a drop in the middle of the run: then densification is pruning too aggressively — an indicator of wrong defaults or a known MCMC collapse bug (v1.4.4 hotfix topic).
How do you read the loss curve?
The loss chart is the most important diagnostic tool in the Inspector — no other indicator shows so directly whether the training is making useful progress or is stuck. The typical healthy shape is a rapid drop in the first 1000-3000 iterations (from ~0.15 to ~0.05), followed by a slow, steady decline until the end of training (down to 0.020-0.030). Logarithmically, the curve then looks like a smooth diagonal.
What does a plateau in the loss mean? If the curve stays flat over several thousand iterations, there are two possible interpretations: (a) training has "converged" — the loss can no longer drop significantly, because the model is as good as it can be with the given data and settings. That's desired; that means "done". (b) training is "stuck" — the loss could actually still drop, but optimization is stagnating (local minimum, learning rate too small, densification off). How to tell them apart: if the loss value is in a typically good range (0.020-0.030 for indoor/object, 0.040-0.060 for outdoor) and the curve has been flat for 5K iterations, it's converged. If the value is noticeably higher than for comparable scenes (e.g., 0.08), it's stuck.
Caution: Gaussian plateau ≠ loss plateau. A plateau in the Gaussian count does not mean "training is done". It only means that densification has stopped adding new points — either because Densify Until has been reached (Classic) or because the MCMC cap is full. Training continues after that, just refining the existing points. You should read the actual "done" signal from the loss curve and the iteration display (I30), not from here.
Rule of thumb for aborting: If the loss curve is above 0.08 after 5000+ iterations and is barely dropping anymore, there's a high probability that the SfM reconstruction has gone wrong. Abort training, check in chapter 9 whether the chosen SfM backend fits the scene, switch to COLMAP/Native if necessary, then restart. Better to invest 10 minutes in better SfM than 2 hours of training with poor camera alignment.
When to reach for the Inspector?
Quick reference: Which section + which controls for which typical use case?
| Common Task | Section | Control IDs |
|---|---|---|
| Desaturate colors of the finished splat | Look | L1 (Saturation) |
| Round out needle/confetti splats | Look | L2 (Splat length) |
| Fill a holey cloud / enlarge splats | Look | L3 (Splat size) |
| Hide distant "far confetti" during orbits | Look | L4 (Fade far region) |
| Discard look adjustments | Look | L5 (Reset finishing) |
| Load a preset setup | Presets | I7 (click a row) |
| Save your own setup | Presets | I1 → I2 → I4 |
| Share a setup with colleagues | Presets | I5 (Export) resp. I6 (Import) |
| Switch SfM backend (e.g. because Apple PG is too unstable) | Cameras & Capture | I12 (see chapter 9) |
| Process video frames without EXIF focal length | Cameras & Capture | I13 (FOV Override) |
| COLMAP performance: GLOMAP instead of Classic | Cameras & Capture | I14 — only in developer builds, the App Store build lacks COLMAP as a backend |
| Switch from Classic to MCMC | Training Configuration | I15 |
| Let training run longer | Training Configuration | I18 (Max Iter) + I20 (Densify Until) — coupled via I19 |
| Halve GPU time | Training Configuration | I22 (Render Scale to 50%) |
| Training quality +6% (MCMC) | Training Configuration | I16 (MCMC Quality) |
| Outdoor scene with many SfM points | Training Configuration | I17 (Auto-scale by scene) |
| Set up / change COLMAP path | Cameras & Capture | I23 / I24 / I25 — only in developer builds |
| Make export files smaller | Training | I26 (always leave on) |
| That last bit of detail on fine structures | Training | I29 (Perceptual Loss 0.05-0.1) |
| Monitor training | Progress ▸ Training Metrics | I30 (Progress), I36 (Pace) — the remaining time is shown in the transport strip below the viewport |
| Assess quality early | Progress ▸ Training Metrics | I31 (Loss < 0.05 after 5K = good) |
| Suspected SfM problem | Progress (both groups) | I31 + I39 (Loss > 0.08 after 5K → redo SfM) |
| Distinguish convergence vs. stuck | Progress ▸ Loss History | I39 + I40 (reading the loss plateau) |
| Recognizing a densification problem | Progress ▸ Loss History | I41 (Gaussian curve drops → bug) |